
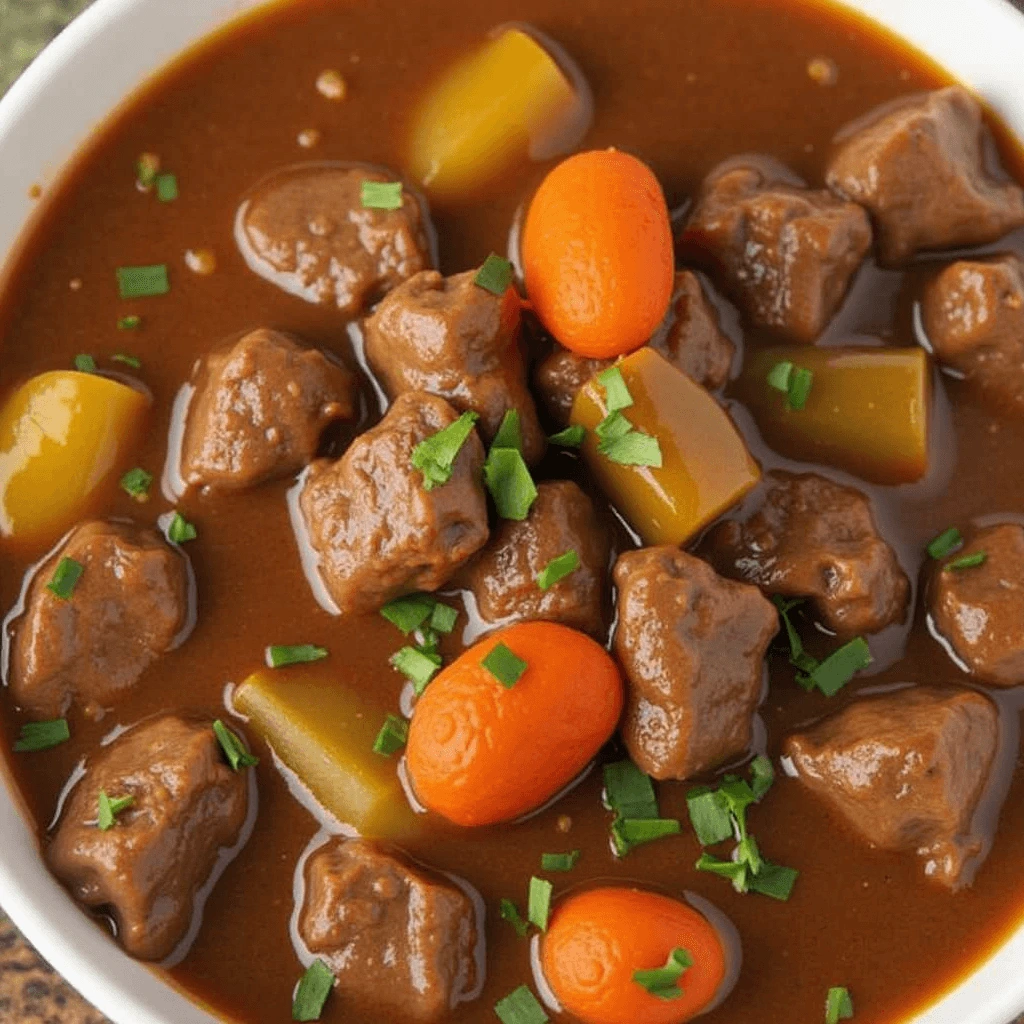
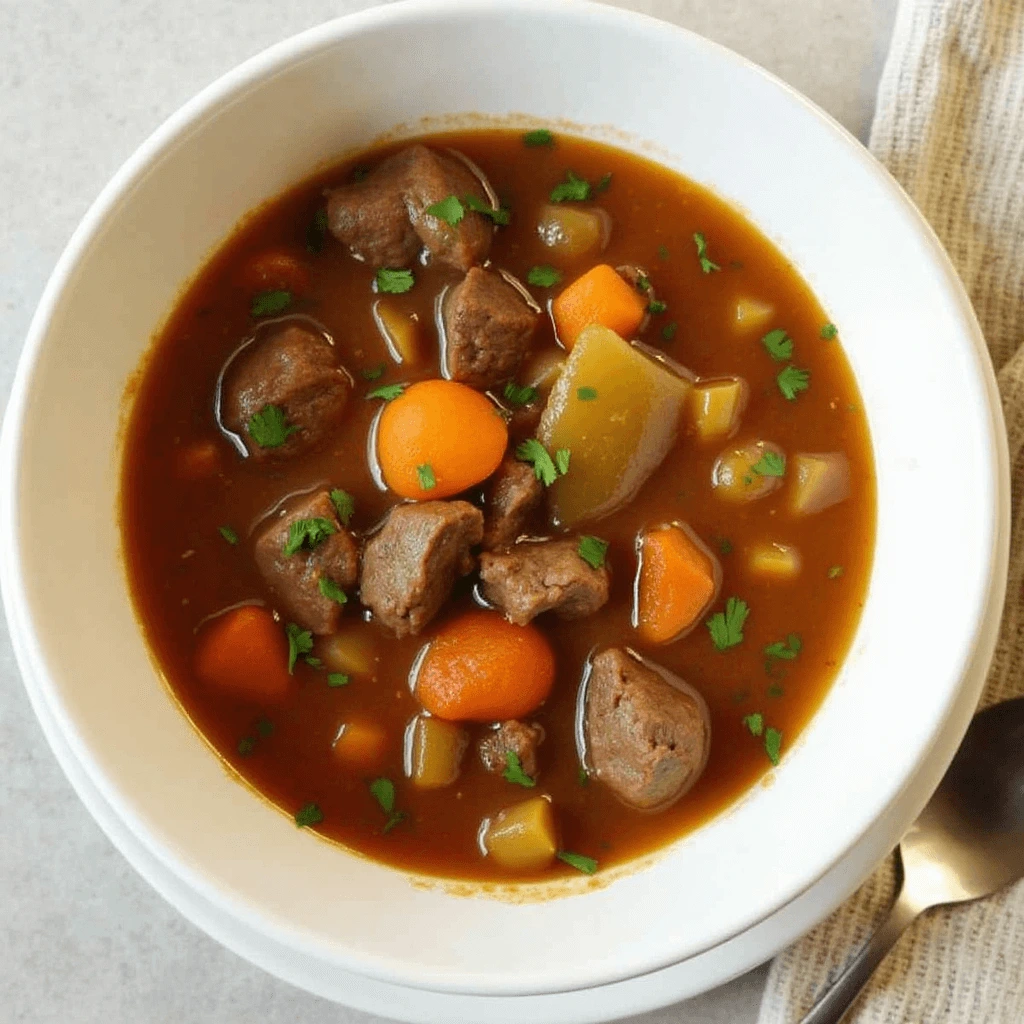
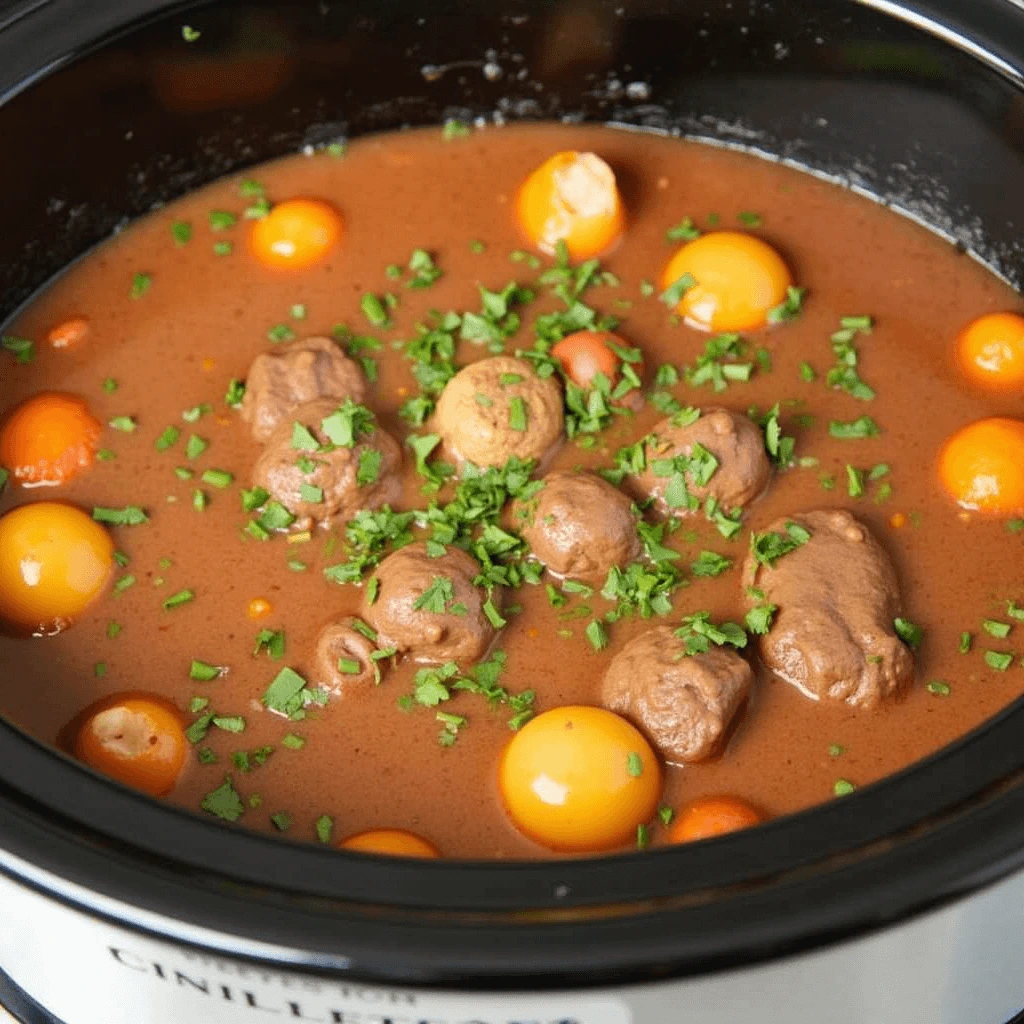
Few dishes are as comforting as a hearty bowl of beef stew. Picture tender beef, soft vegetables, and a rich, savory broth. With a slow cooker beef stew recipe, you can enjoy this classic meal with minimal effort. Let your slow cooker do the work while you relax!
This recipe is perfect for busy parents, meal prep lovers, or anyone craving a home-cooked dinner. The slow simmering process makes the beef incredibly tender. Vegetables soak up all the delicious flavors of herbs and spices. Plus, it’s versatile—ideal for winter nights, family dinners, or weekly meal prep.
In this post, we’ll show you how to make the perfect slow cooker beef stew. Learn how to pick the best beef, season like a pro, and thicken your stew to perfection. These tips will help you create a dish everyone will love.
Brown the Meat for Maximum Flavor
Why Browning Matters: Adds Depth and Richness to the Stew
Browning the beef before adding it to the slow cooker is a crucial step that transforms your stew from good to extraordinary. Here’s why it matters:
- Enhances Flavor:
When you sear the beef over high heat, the Maillard reaction occurs. As a result, this chemical process creates complex, savory flavors that you simply can’t achieve by boiling or simmering alone. In the end, you get a richer, deeper taste that makes every bite unforgettable. - Adds Color and Visual Appeal:
Not only does browning give the beef a beautiful caramelized crust, but it also adds texture to the stew. Moreover, a well-browned stew is more visually appealing, making it even more enticing to eat. - Locks in Juices:
By searing the beef at high heat, you help seal in its natural juices. This ensures the meat stays tender and moist during the long cooking process. As a result, the beef won’t dry out, even after hours in the slow cooker. - Builds a Flavorful Foundation:
After browning, the browned bits left in the pan (called fond) are packed with flavor. When you deglaze the pan with broth, wine, or tomato paste, you incorporate these bits into the stew. Consequently, this creates a more robust and layered flavor profile. - Balances the Dish:
In addition to adding a subtle smokiness and umami depth, browning balances the sweetness of the vegetables and the richness of the broth. Ultimately, this harmony of flavors is what makes a truly exceptional beef stew.
Pro Tip for Browning:
- First, pat the beef dry with paper towels before browning. This is because moisture prevents proper searing.
- Next, use a heavy-bottomed skillet or Dutch oven for even heat distribution.
- Finally, avoid overcrowding the pan—brown the beef in batches to ensure each piece gets a perfect crust.
By taking the time to brown your beef, you’re investing in a stew that’s bursting with flavor and texture. In short, it’s a small step with a big payoff!
How to Brown Meat Properly: Use High Heat and Avoid Overcrowding the Pan
Browning meat is a simple yet essential step for building flavor in your slow cooker beef stew. Here’s how to do it right:
- Start with Dry Meat:
Before you begin, pat the beef dry with paper towels. This is because moisture on the surface of the meat can create steam, which prevents proper browning. As a result, dry meat will sear better and develop a beautiful crust. - Use High Heat:
To achieve a good sear, heat your skillet or Dutch oven over medium-high to high heat. Once the pan is hot, add a small amount of oil (like vegetable or olive oil) and let it shimmer. This ensures the meat browns quickly and evenly without steaming. - Season Generously:
Before adding the meat to the pan, season it generously with salt and pepper. Not only does this enhance the flavor, but it also helps create a flavorful crust during browning. - Avoid Overcrowding the Pan:
When browning meat, give each piece enough space in the pan. If you overcrowd the pan, the temperature drops, and the meat releases moisture, leading to steaming instead of searing. Instead, brown the meat in batches to ensure each piece gets a perfect, caramelized crust. - Don’t Move the Meat Too Soon:
Once you place the meat in the pan, resist the urge to move it around. Let it sit for 2-3 minutes to develop a golden-brown crust. Then, use tongs to flip the pieces and repeat on the other side. - Deglaze the Pan:
After browning, you’ll notice flavorful browned bits (called fond) stuck to the pan. To capture this flavor, deglaze the pan with a splash of broth, wine, or tomato paste. Scrape the bits with a wooden spoon and add them to your slow cooker. This step adds incredible depth to your stew.
Pro Tips for Perfect Browning:
- Use the Right Pan: A heavy-bottomed skillet or Dutch oven distributes heat evenly, preventing hot spots.
- Don’t Skip the Oil: A thin layer of oil helps conduct heat and prevents sticking.
- Monitor the Heat: If the pan starts to smoke, reduce the heat slightly to avoid burning.
- Work in Batches: If you’re cooking a large amount of meat, divide it into smaller batches for consistent results.
By following these steps, you’ll achieve perfectly browned meat that adds rich, savory flavor to your slow cooker beef stew. In the end, this small effort makes a big difference in the final dish!
Deglaze the Pan: Use Broth or Red Wine to Scrape Up Flavorful Bits
Deglazing is a simple yet transformative step that elevates your slow cooker beef stew from good to extraordinary. Here’s why it matters and how to do it right:
What is Deglazing?
After browning the meat, you’ll notice browned bits (called fond) stuck to the bottom of the pan. These bits are packed with concentrated flavor from the Maillard reaction. To capture this flavor, you deglaze the pan by adding a liquid and scraping the bits with a wooden spoon. This process not only enhances the flavor of your stew but also ensures no delicious bits go to waste.
Why Should You Deglaze?
Deglazing is a game-changer for your stew because:
- Adds Depth: The fond contains caramelized sugars, proteins, and fats that add richness and complexity to your stew.
- Prevents Waste: Deglazing ensures you don’t lose any of the delicious flavors created during browning.
- Enhances the Sauce: The deglazing liquid becomes part of the stew’s base, infusing it with extra flavor.
In short, deglazing is the secret to a deeply flavorful and well-rounded stew.
How to Deglaze Properly
Follow these steps to deglaze like a pro:
- Choose Your Liquid: Use broth, red wine, or even tomato paste. For example, red wine adds acidity and depth, while broth keeps the flavor neutral.
- Heat the Pan: After removing the browned meat, keep the pan on medium heat. Then, add your chosen liquid (about ½ cup) to the hot pan.
- Scrape the Bits: As the liquid heats up, use a wooden spoon to scrape the browned bits from the bottom of the pan. This process loosens the fond and incorporates it into the liquid.
- Simmer Briefly: Let the liquid simmer for 1-2 minutes to reduce slightly and concentrate the flavors. Finally, pour this flavorful mixture into your slow cooker.
Pro Tips for Deglazing
- Don’t Use Cold Liquid: Cold liquid can shock the hot pan and make it harder to scrape the bits. Instead, use room-temperature or slightly warmed liquid.
- Avoid Non-Stick Pans: Since non-stick pans don’t develop fond as well, use stainless steel or cast iron for browning and deglazing.
- Experiment with Liquids: Try different liquids like white wine, beer, or even balsamic vinegar for unique flavor profiles.
Why This Step is a Game-Changer
By deglazing the pan, you’re not just cleaning it—you’re building layers of flavor that make your stew unforgettable. In the end, this small step ensures every spoonful of your slow cooker beef stew is rich, savory, and deeply satisfying.
Layer Ingredients Correctly
Vegetables at the Bottom: Dense Veggies Like Carrots and Potatoes Cook Slower
Layering ingredients correctly in your slow cooker is key to ensuring everything cooks evenly and turns out perfectly tender. Here’s why dense vegetables like carrots and potatoes should go at the bottom and how to do it right:
Why Dense Vegetables Belong at the Bottom
Dense vegetables like carrots, potatoes, and parsnips take longer to cook than other ingredients. By placing them at the bottom, you ensure they’re closer to the heat source and have enough time to soften. Here’s why this matters:
- Even Cooking: Dense veggies need more time to break down and become tender. If they’re placed on top, they might remain undercooked while the meat and other ingredients overcook.
- Flavor Infusion: As these vegetables cook, they release their natural sweetness and absorb the savory flavors of the broth and meat. This creates a harmonious blend of flavors in your stew.
- Prevents Mushiness: When placed at the bottom, dense vegetables maintain their structure better, preventing them from turning mushy.
How to Layer Vegetables Properly
Follow these steps to layer your slow cooker like a pro:
- Start with Dense Vegetables: Place carrots, potatoes, parsnips, or other root vegetables at the bottom of the slow cooker. This ensures they’re closest to the heat and cook thoroughly.
- Add the Meat: Next, layer the browned beef on top of the vegetables. This allows the meat to cook evenly while the vegetables soften beneath it.
- Top with Delicate Vegetables: Finally, add softer vegetables like peas, green beans, or zucchini on top. Since these cook faster, they’ll be perfectly tender by the time the stew is done.
Pro Tips for Perfect Vegetable Layering
- Cut Evenly: Chop dense vegetables into uniform sizes to ensure they cook at the same rate.
- Don’t Overcrowd: Leave some space between the vegetables to allow heat and liquid to circulate evenly.
- Stir Occasionally (If Possible): If you’re home while the stew cooks, give it a gentle stir halfway through to ensure even cooking.
Why This Step Matters
By layering vegetables at the bottom, you’re setting the foundation for a perfectly cooked stew. In the end, this simple step ensures every ingredient is tender, flavorful, and cooked to perfection.
Meat in the Middle: Ensures Even Cooking and Flavor Distribution
Layering your slow cooker properly is essential for a perfectly cooked beef stew. Placing the meat in the middle of the ingredients is a game-changer for even cooking and flavor distribution. Here’s why it matters and how to do it right:
Why Meat Belongs in the Middle
The middle layer is the sweet spot for cooking meat in a slow cooker. Here’s why:
- Even Heat Distribution: By placing the meat in the middle, it’s surrounded by heat from both the bottom and top layers. This ensures the meat cooks evenly and stays tender.
- Flavor Infusion: As the meat cooks, its juices drip down into the vegetables below and mingle with the broth. At the same time, it absorbs flavors from the vegetables and seasonings above. This creates a rich, well-balanced stew.
- Prevents Overcooking: When meat is placed directly at the bottom, it can overcook and become tough. Similarly, if it’s on top, it might not cook thoroughly. The middle layer strikes the perfect balance.
How to Layer Meat Properly
Follow these steps to layer your slow cooker like a pro:
- Start with Dense Vegetables: Place root vegetables like carrots, potatoes, and parsnips at the bottom. This ensures they’re closest to the heat and cook thoroughly.
- Add the Meat: Next, layer the browned beef on top of the vegetables. This allows the meat to cook evenly while the vegetables soften beneath it.
- Top with Delicate Ingredients: Finally, add softer vegetables like peas, green beans, or zucchini on top. Since these cook faster, they’ll be perfectly tender by the time the stew is done.
Pro Tips for Perfect Meat Layering
- Brown the Meat First: Before adding it to the slow cooker, brown the meat in a skillet. This step adds depth of flavor and improves texture.
- Cut Meat Evenly: Chop the beef into uniform chunks to ensure even cooking.
- Season Generously: Season the meat with salt, pepper, and your favorite herbs before layering. This enhances the overall flavor of the stew.
Why This Step is a Game-Changer
By placing the meat in the middle, you’re ensuring it cooks evenly, stays tender, and absorbs maximum flavor. In the end, this simple step transforms your stew into a hearty, flavorful dish that everyone will love.
Add Broth, Wine, or Tomato Paste to Cover the Ingredients
Adding the right liquid to your slow cooker beef stew is crucial for creating a flavorful and well-balanced dish. Here’s why broth, wine, or tomato paste works best and how to use them effectively:
Why Liquids Matter in Stew
Liquids are the foundation of any great stew. Here’s why they’re essential:
- Prevents Drying Out: Without enough liquid, the meat and vegetables can dry out during the long cooking process.
- Creates Flavorful Broth: As the stew simmers, the liquid absorbs flavors from the meat, vegetables, and seasonings, creating a rich and savory broth.
- Helps Tenderize Meat: The moisture from the liquid breaks down tough muscle fibers in the meat, making it tender and juicy.
Choosing the Right Liquid
The type of liquid you use can significantly impact the flavor of your stew. Here’s a breakdown of your options:
- Broth (Beef or Chicken):
- Adds Depth: Beef broth enhances the meaty flavor, while chicken broth keeps the stew lighter.
- Versatile: Broth is a neutral base that works well with any seasoning or vegetable combination.
- Red Wine:
- Adds Complexity: Red wine brings acidity and richness, balancing the sweetness of the vegetables and the richness of the meat.
- Pro Tip: Use a dry red wine like Cabernet Sauvignon or Merlot for the best results.
- Tomato Paste:
- Adds Umami: Tomato paste contributes a deep, savory flavor and helps thicken the stew.
- Pro Tip: Sauté the tomato paste with the meat or vegetables before adding it to the slow cooker for a richer taste.
How Much Liquid to Add
The key is to add enough liquid to cover the ingredients without drowning them. Here’s how to get it right:
- Cover the Ingredients: Pour in enough liquid (broth, wine, or a combination) to just cover the meat and vegetables. This ensures everything cooks evenly and stays moist.
- Avoid Overfilling: If you add too much liquid, the stew can become watery. Aim for about 2/3 full in your slow cooker.
- Adjust as Needed: If the stew looks too dry during cooking, add a splash of broth or water. Conversely, if it’s too thin, remove the lid and let it simmer on high to reduce.
Pro Tips for Using Liquids
- Layer Flavors: Combine liquids for a more complex flavor profile. For example, use a mix of broth and red wine.
- Deglaze the Pan: After browning the meat, deglaze the pan with your chosen liquid to capture all the flavorful bits.
- Season the Liquid: Add herbs (like thyme or rosemary), bay leaves, and a pinch of salt and pepper to the liquid for extra flavor.
Why This Step is a Game-Changer
By adding the right amount of liquid, you’re ensuring your stew is moist, flavorful, and perfectly balanced. In the end, this step transforms your slow cooker beef stew into a comforting and satisfying meal.
Use the Right Cooking Time and Settings
Low and Slow: 6-8 Hours on Low for Tender Meat
Cooking beef stew in a slow cooker is all about patience and precision. The low and slow method—cooking on low heat for 6-8 hours—is the secret to achieving melt-in-your-mouth tender meat. Here’s why this method works and how to do it right:
Why Low and Slow Works
The low and slow method is ideal for tough cuts of beef, like chuck or brisket, which are perfect for stew. Here’s why:
- Breaks Down Connective Tissue: When cooked at a low temperature for several hours, the collagen in the meat breaks down into gelatin. As a result, this process makes the meat incredibly tender and juicy.
- Prevents Overcooking: Unlike high heat, which can dry out meat, low heat ensures the beef stays moist and flavorful. Additionally, it allows the meat to cook evenly without becoming tough.
- Enhances Flavor: As the stew simmers slowly, the flavors of the meat, vegetables, and seasonings meld together. Consequently, this creates a rich and complex dish that’s deeply satisfying.
How to Cook Low and Slow
Follow these steps to master the low and slow method:
- Set Your Slow Cooker to Low: After layering your ingredients, set the slow cooker to the low setting. This ensures the stew cooks gently over several hours.
- Cook for 6-8 Hours: Depending on the size of your meat chunks and the type of slow cooker, aim for 6-8 hours. This timeframe allows the meat to become fork-tender without falling apart.
- Check for Doneness: After 6 hours, check the meat for tenderness. If it’s not quite ready, let it cook for another hour or two. However, avoid overcooking, as the meat can become mushy.
Pro Tips for Perfect Low and Slow Cooking
- Use the Right Cut: Choose tough, collagen-rich cuts like chuck, brisket, or round. These cuts are perfect for long, slow cooking.
- Don’t Overfill the Slow Cooker: Leave some space (about 2/3 full) to allow heat and liquid to circulate evenly. Otherwise, the stew may not cook properly.
- Avoid Lifting the Lid: Every time you lift the lid, heat escapes, which can extend the cooking time. Therefore, only check the stew when necessary.
- Add Delicate Ingredients Later: If you’re using softer vegetables or herbs, add them in the last hour of cooking. This prevents them from overcooking and becoming mushy.
Why This Method is a Game-Changer
By cooking low and slow, you’re ensuring the meat becomes tender, the flavors deepen, and the stew turns out perfectly balanced. In the end, this method transforms your beef stew into a comforting, restaurant-quality dish that’s worth the wait.
High Heat Option: 3-4 Hours on High for Quicker Cooking
While the low and slow method is ideal for tenderizing tough cuts of beef, sometimes you need dinner on the table faster. The high heat option—cooking on high for 3-4 hours—is a great alternative for quicker cooking. Here’s why it works and how to do it right:
Why High Heat Works
Cooking on high heat is perfect for when you’re short on time but still want a flavorful and tender stew. Here’s why:
- Faster Cooking: By increasing the temperature, you can reduce the cooking time significantly. This is ideal for busy weeknights or last-minute meals.
- Still Tender Meat: Although high heat cooks faster, it still breaks down collagen in the meat, making it tender. However, the meat may not be as fall-apart tender as with the low and slow method.
- Retains Flavor: Even though the cooking time is shorter, the stew still develops rich flavors as the ingredients simmer together.
How to Cook on High Heat
Follow these steps to make the most of the high heat option:
- Set Your Slow Cooker to High: After layering your ingredients, set the slow cooker to the high setting. This ensures the stew cooks quickly and evenly.
- Cook for 3-4 Hours: Depending on the size of your meat chunks and the type of slow cooker, aim for 3-4 hours. This timeframe allows the meat to become tender without overcooking.
- Check for Doneness: After 3 hours, check the meat for tenderness. If it’s not quite ready, let it cook for another hour. However, avoid overcooking, as the meat can become dry.
Pro Tips for Perfect High Heat Cooking
- Cut Meat Smaller: To ensure even and faster cooking, cut the beef into smaller, uniform chunks (about 1-1.5 inches).
- Monitor Liquid Levels: Since high heat can cause liquids to evaporate faster, check the stew occasionally and add more broth or water if needed.
- Add Delicate Ingredients Later: If you’re using softer vegetables or herbs, add them in the last 30-60 minutes of cooking. This prevents them from becoming mushy.
- Stir Occasionally: If possible, give the stew a gentle stir halfway through cooking to ensure even heat distribution.
When to Use the High Heat Option
The high heat option is perfect for:
- Busy Weeknights: When you need dinner ready in a few hours.
- Smaller Cuts of Meat: Smaller chunks of beef cook faster and work well with high heat.
- Last-Minute Meals: When you forget to start the slow cooker early but still want a hearty meal.
Why This Option is a Game-Changer
By using the high heat option, you can enjoy a delicious and tender beef stew in less time. While it may not be as fall-apart tender as the low and slow method, it’s still a flavorful and convenient way to make a comforting meal.
Avoid Overcooking: Check for Doneness to Prevent Mushy Vegetables
One of the biggest challenges when making slow cooker beef stew is ensuring the vegetables don’t turn to mush. Overcooked vegetables can ruin the texture of your stew, but with a few simple tips, you can keep them perfectly tender. Here’s how to avoid overcooking and achieve the ideal texture:
Why Overcooking Happens
Vegetables, especially softer ones like potatoes, carrots, and peas, can easily overcook in a slow cooker. Here’s why:
- Long Cooking Times: Since slow cookers are designed to cook food over several hours, delicate vegetables can break down too much.
- High Heat: If you’re using the high heat setting, vegetables can become mushy faster.
- Cut Size: When vegetables are cut too small, they cook quicker and are more prone to overcooking.
How to Check for Doneness
To prevent mushy vegetables, it’s important to check for doneness at the right time. Here’s how:
- Test with a Fork: After the recommended cooking time, pierce a piece of vegetable with a fork. If it’s tender but still holds its shape, it’s done. If it’s too firm, let it cook a bit longer.
- Taste Test: Sometimes, the best way to check is to taste a small piece. This ensures the vegetables are cooked to your preference.
- Monitor Cooking Time: If you’re using the high heat setting, check the vegetables after 2-3 hours. For low heat, check after 6-7 hours.
Pro Tips to Prevent Mushy Vegetables
- Cut Vegetables Uniformly: Chop vegetables into larger, even-sized pieces (about 1-1.5 inches). This ensures they cook evenly and don’t break down too quickly.
- Add Delicate Vegetables Later: If you’re using softer vegetables like peas, green beans, or zucchini, add them in the last 30-60 minutes of cooking. This prevents them from becoming mushy.
- Use Firm Vegetables: Opt for vegetables that hold up well during long cooking times, such as carrots, parsnips, and potatoes.
- Avoid Overcrowding: When the slow cooker is too full, heat doesn’t circulate evenly, which can lead to uneven cooking and mushy vegetables.
How to Fix Overcooked Vegetables
If your vegetables have already turned mushy, don’t worry! Here’s how to salvage your stew:
- Add Fresh Vegetables: If there’s still time, add a handful of fresh or frozen vegetables and cook for an additional 20-30 minutes.
- Blend the Stew: For a thicker texture, use an immersion blender to partially blend the stew. This creates a creamy consistency while masking the overcooked vegetables.
- Serve with a Side: To balance the texture, serve the stew with crusty bread or a side of rice.
Why This Step is a Game-Changer
By avoiding overcooking, you’re ensuring your stew has the perfect balance of tender meat and firm, flavorful vegetables. In the end, this step transforms your slow cooker beef stew into a dish that’s both visually appealing and delicious.
Thicken the Stew for a Rich Texture
Use Flour or Cornstarch: Mix with Water to Create a Slurry
A thick, rich broth is one of the hallmarks of a perfect beef stew. Using flour or cornstarch to create a slurry is an easy and effective way to thicken your stew to the ideal consistency. Here’s why it works and how to do it right:
Why Thicken Your Stew?
Thickening your stew serves several purposes:
- Enhances Texture: A thicker broth clings to the meat and vegetables, making every bite more satisfying.
- Balances Flavors: By thickening the broth, you concentrate the flavors, creating a richer and more robust dish.
- Improves Presentation: A well-thickened stew looks more appetizing and professional.
How to Make a Slurry
A slurry is a mixture of flour or cornstarch and water that’s used to thicken liquids. Here’s how to make and use one:
- Choose Your Thickener:
- Flour: If you prefer a traditional thickener, use all-purpose flour. However, it requires longer cooking to eliminate the raw flour taste.
- Cornstarch: For a gluten-free option that thickens quickly, use cornstarch. It also creates a glossy finish.
- Mix with Cold Water: In a small bowl, combine 1-2 tablespoons of flour or cornstarch with an equal amount of cold water. Stir until smooth and lump-free.
- Add to the Stew: Once the stew is nearly done, stir in the slurry. Cook for an additional 10-15 minutes to allow the broth to thicken.
Pro Tips for Perfect Thickening
- Use Cold Water: Always mix flour or cornstarch with cold water to prevent clumping. Hot water can cause the starch to gelatinize too quickly, creating lumps.
- Add Gradually: Start with a small amount of slurry and add more as needed. This prevents over-thickening.
- Simmer After Adding: After adding the slurry, let the stew simmer for at least 10 minutes. This ensures the thickener is fully incorporated and cooked through.
- Adjust Consistency: If the stew is too thick, add a splash of broth or water. If it’s too thin, make another slurry and repeat the process.
Alternative Thickening Methods
If you don’t have flour or cornstarch on hand, try these alternatives:
- Mash Some Vegetables: For a natural thickener, mash a few pieces of cooked potato or carrot and stir them into the stew.
- Use Tomato Paste: A tablespoon or two of tomato paste can add thickness and richness to the broth.
- Reduce the Liquid: If you have time, remove the lid and let the stew simmer on high to reduce and thicken naturally.
Why This Step is a Game-Changer
By using a slurry, you’re ensuring your stew has the perfect, velvety texture that makes it irresistible. In the end, this simple step elevates your slow cooker beef stew from good to gourmet.
Mash Some Vegetables: Potatoes or Carrots Can Naturally Thicken the Stew
One of the easiest and most natural ways to thicken your slow cooker beef stew is by mashing some of the vegetables right into the broth. This method not only enhances the texture of your stew but also deepens its flavor without the need for additional thickeners like flour or cornstarch. Here’s how you can do it effectively:
1. Choosing the Right Vegetables for Thickening
Not all vegetables will work well as natural thickeners. The best choices include:
- Potatoes: Russet or Yukon Gold potatoes break down easily and add a creamy texture.
- Carrots: Sweet and starchy, they blend well and enhance the flavor of the stew.
- Parsnips: A great alternative to carrots with a slightly nutty flavor.
2. When and How to Mash Vegetables in Your Stew
To get the best results, follow these steps:
- Step 1: Cook Until Soft – Allow your potatoes, carrots, or parsnips to cook until they are very soft, typically during the last hour of slow cooking.
- Step 2: Mash Them in the Pot – Use a fork, potato masher, or the back of a spoon to mash some of the vegetables directly into the stew. Stir well to distribute the thickened texture evenly.
- Step 3: Blend for Extra Creaminess (Optional) – If you prefer a smoother consistency, you can remove some of the broth and blend it with the mashed vegetables before adding it back to the stew.
3. Benefits of Mashing Vegetables for Thickening
- No Extra Ingredients Needed – Unlike flour or cornstarch, this method keeps your stew gluten-free and avoids unnecessary additives.
- Enhanced Flavor – Mashed carrots or parsnips add a natural sweetness that complements the savory beef.
- Nutrient Boost – Instead of straining out vegetables, you retain all the vitamins and fiber.
Reduce the Liquid: Remove the Lid and Cook on High for the Last 30 Minutes
One of the simplest ways to thicken your slow cooker beef stew naturally is by reducing the liquid content. Since slow cookers trap moisture, the broth can sometimes be thinner than desired. Removing the lid and cooking on high for the last 30 minutes allows excess liquid to evaporate, creating a richer, more concentrated stew. Here’s how to do it effectively:
1. Why Reducing the Liquid Works
Slow cookers create a sealed cooking environment, preventing evaporation. While this helps keep meats tender, it can also result in a broth that is thinner than expected. By removing the lid at the end of cooking, you allow steam to escape, which naturally thickens the stew by concentrating the flavors and reducing excess moisture.
2. When and How to Reduce the Liquid
Follow these steps for the best results:
- Step 1: Assess the Stew’s Thickness – About an hour before serving, check the consistency of your beef stew. If it’s too thin, plan to reduce the liquid.
- Step 2: Remove the Lid – In the final 30-45 minutes of cooking, take the lid off the slow cooker.
- Step 3: Increase Heat to High – Turn the setting to high to speed up evaporation. Stir occasionally to prevent ingredients from sticking to the bottom.
- Step 4: Monitor the Reduction – Keep an eye on the stew and adjust cooking time as needed. If it thickens too much, you can add a splash of broth or water to reach the desired consistency.
3. Tips for Best Results
- Use a Wide, Shallow Slow Cooker – If possible, a wider surface area allows for faster evaporation.
- Stir Occasionally – This helps distribute the heat evenly and prevents burning.
- Add Herbs at the End – If you want to preserve the fresh taste of herbs like parsley or thyme, add them after reducing the liquid.
4. Benefits of This Method
- No Extra Ingredients Needed – No need for flour, cornstarch, or other thickeners.
- Enhanced Flavor – The reduced liquid results in a more concentrated, flavorful stew.
- Better Texture – The broth becomes thicker without altering the original taste.
Season Generously and Taste as You Go
Essential Herbs and Spices: Thyme, Rosemary, Bay Leaves, Salt, and Pepper
The right combination of herbs and spices is key to making a flavorful and aromatic slow cooker beef stew. While beef stew is known for its rich and hearty taste, adding the right seasonings enhances its depth, balances flavors, and elevates the overall dish. Below, we’ll explore the essential herbs and spices—thyme, rosemary, bay leaves, salt, and pepper—and how to use them effectively.
1. Thyme: The Earthy Backbone
Thyme is a classic herb in beef stew, providing a subtle earthy flavor that complements the richness of slow-cooked beef.
How to Use Thyme in Stew:
- Fresh vs. Dried: Fresh thyme has a slightly milder taste, while dried thyme is more concentrated. If using dried, start with ½ teaspoon and adjust as needed.
- When to Add It: Add thyme at the beginning of the cooking process so it has time to infuse the broth. If using fresh sprigs, remove them before serving.
- Flavor Benefits: Adds a warm, herbal note that enhances the stew’s savory profile.
2. Rosemary: The Bold and Aromatic Touch
Rosemary brings a slightly piney, woody flavor that pairs well with slow-cooked beef.
How to Use Rosemary in Stew:
- Fresh vs. Dried: Fresh rosemary has a more intense aroma, while dried rosemary is more potent in small amounts. Use one small sprig fresh or ½ teaspoon dried.
- When to Add It: Add rosemary early in the cooking process to allow its oils to release slowly. Remove whole sprigs before serving.
- Flavor Benefits: Enhances the meaty, umami taste of the beef while adding depth and warmth.
3. Bay Leaves: The Secret Ingredient for Depth
Bay leaves are often overlooked but play a crucial role in rounding out the flavors of a slow cooker beef stew.
How to Use Bay Leaves in Stew:
- Dried Bay Leaves Only: Fresh bay leaves can be overpowering; dried ones offer a more balanced taste.
- When to Add It: Add 1-2 dried bay leaves at the beginning of cooking, then remove them before serving.
- Flavor Benefits: Adds a subtle, almost floral aroma that enhances the complexity of the stew.
4. Salt: The Essential Flavor Enhancer
Salt is crucial for drawing out the natural flavors of beef, vegetables, and broth.
How to Use Salt in Stew:
- Types of Salt: Use kosher salt or sea salt for a cleaner taste. Avoid table salt, which can be too harsh.
- When to Add It: Season in layers—lightly salt the beef before browning, add some to the broth, and adjust before serving.
- Flavor Benefits: Proper seasoning ensures a well-balanced stew where no ingredient overpowers the others.
5. Black Pepper: The Finishing Spice
Black pepper adds a mild heat and depth of flavor to beef stew.
How to Use Black Pepper in Stew:
- Freshly Ground vs. Pre-Ground: Freshly ground black pepper has a more vibrant taste, while pre-ground pepper can lose potency over time.
- When to Add It: Add a small amount while cooking and more at the end to adjust seasoning.
- Flavor Benefits: Brings out the natural umami flavors of the beef and enhances the overall taste.
Bonus Tip: Experimenting with Additional Spices
If you want to add even more depth to your beef stew, consider experimenting with:
- Paprika (smoked or sweet) – Adds warmth and slight sweetness.
- Garlic Powder – Boosts the umami factor.
- Onion Powder – Enhances the savory elements.
- Cayenne Pepper or Red Pepper Flakes – For a little kick of heat.
Add Acid for Balance: A Splash of Red Wine or Vinegar Brightens the Flavor
A well-rounded beef stew isn’t just about the savory richness of slow-cooked beef. To create a truly balanced and flavorful dish, it’s essential to incorporate a touch of acid. Acidity helps cut through the richness of the beef, while also enhancing the natural flavors of vegetables, herbs, and seasonings. By adding a splash of red wine or vinegar at the right moment, you can elevate your stew to new heights of flavor and complexity. Here’s why acid is a key ingredient in the perfect slow cooker beef stew:
1. The Role of Acid in Beef Stew
Acid works on several levels in beef stew:
- Balancing Richness: Slow-cooked beef, while tender and flavorful, can sometimes feel heavy. A splash of acid helps to counteract that richness, providing a lift to the overall taste. It lightens the flavor, making the stew feel more balanced rather than overly rich or greasy.
- Enhancing Vegetables and Herbs: Acid also works to brighten the flavors of the vegetables, such as carrots, onions, and tomatoes, that are commonly found in beef stew. It enhances the sweetness of the vegetables, allowing their natural flavors to shine through. At the same time, it elevates the aromatic herbs like thyme, rosemary, and bay leaves, creating a more harmonious dish.
- Tenderizing the Meat: Acid helps break down the muscle fibers in tougher cuts of beef like chuck roast, making them more tender and easier to shred. It works to soften the meat without compromising its texture, ensuring each bite is melt-in-your-mouth tender.
2. Red Wine: A Classic Choice for Rich Depth
Red wine has long been a staple in beef stew recipes. The rich, fruity, and earthy notes of red wine blend beautifully with the umami of the beef, creating a complex and layered broth. Whether you’re making a classic French beef bourguignon or another variation, red wine provides depth and intensity, enriching the overall flavor profile of the dish.
- How to Use Red Wine in Stew: After browning the meat, deglaze the pan with about ½ to 1 cup of red wine to capture all the flavorful bits that may have stuck to the bottom of the pan. This process adds complexity to the stew. Allow the alcohol to cook off before letting the stew simmer in the slow cooker.
- Wine Pairing Tips: Use dry red wines like Cabernet Sauvignon, Merlot, or Pinot Noir. These wines add body and deep flavor to the stew, but avoid using sweet wines, as they can make the stew overly sugary.
- Flavor Benefits: Red wine complements the beef’s rich umami while enhancing the herbal notes. Its earthy undertones create a robust and satisfying depth of flavor that would otherwise be hard to achieve.
3. Vinegar: A Lighter, Tangy Alternative
For those who prefer an alcohol-free option or a more tangy flavor profile, vinegar is a fantastic substitute for red wine. Vinegar adds the same bright acidity but with a slightly different taste, allowing for a more delicate balance in the stew.
- How to Use Vinegar in Stew: Add about 1 tablespoon of vinegar during the last 30 minutes of cooking to ensure that the vinegar’s tangy profile doesn’t overpower the stew. Stir it in and let the flavors meld.
- Vinegar Pairing Tips: Choose red wine vinegar for a fruity, wine-like flavor or apple cider vinegar for a milder, slightly sweet tang. Balsamic vinegar can add a more complex, caramelized sweetness if you’re looking for richness, while sherry vinegar brings a nutty, refined quality.
- Flavor Benefits: Vinegar brightens the overall flavor of the stew, providing a refreshing contrast to the richness of the beef and vegetables. It enhances the sweetness of the vegetables and balances out any heaviness that may result from slow cooking.
4. Other Acidic Ingredients to Enhance the Stew
Red wine and vinegar are not the only acidic ingredients you can use in beef stew. Many other ingredients can also provide the right amount of tang to make your stew more dynamic:
- Tomato Paste: Adds both acidity and umami, helping to thicken the broth while also brightening the flavor. Stir in 1-2 tablespoons of tomato paste while browning the meat to ensure it melds into the stew.
- Diced Tomatoes: These bring natural acidity, while also helping to thicken the broth and provide a slight sweetness to balance the savory flavors.
- Lemon Juice: A squeeze of fresh lemon juice brings a zesty citrusy brightness that works particularly well in lighter variations of beef stew.
- Tamarind Paste: Though less common, tamarind paste offers a unique, tangy flavor that pairs well with the richness of beef stew.
5. Tips for Adding Acid Without Overpowering the Stew
While acid is essential for balancing flavors, it’s important to use it thoughtfully to avoid overpowering the dish:
- Start Small: Begin by adding a small amount of red wine, vinegar, or other acidic ingredients. You can always taste and adjust as you go.
- Taste as You Go: Adding acid is not a one-time step. Taste the stew throughout the cooking process and adjust with small splashes of vinegar or wine.
- Balance with Sweetness: If the acidity feels too strong, balance it with a small pinch of sugar or a drizzle of honey. This will round out the flavors without sacrificing the essential tang.
- Pair with Fresh Herbs: To ensure the acid complements the other ingredients, pair it with aromatic herbs like thyme, rosemary, and bay leaves. These herbs work well with acidity, creating a balanced and flavorful dish.
By carefully balancing the acidity with the richness of the beef, your slow cooker beef stew will have layers of flavor that are both rich and well-rounded. Whether you choose red wine, vinegar, or another acidic ingredient, the key is to use it at the right time and in the right amount for optimal results. With these tips, you can craft a beef stew that’s perfectly balanced and bursting with flavor.
Taste Before Serving: Adjust Seasoning if Needed
The final step in preparing a slow cooker beef stew is one that many home cooks overlook: tasting and adjusting the seasoning just before serving. Even if you’ve carefully followed your recipe, flavors can change during the long cooking process. As the stew simmers, the ingredients meld together, and the seasoning may become either too subtle or too concentrated. Tasting the stew before serving is your opportunity to ensure the flavors are perfectly balanced and to fine-tune the seasoning for the ideal result.
1. Why Tasting Before Serving Is Crucial
As the stew cooks, ingredients continue to release their flavors, and the overall flavor profile can shift. This is why it’s essential to taste your stew toward the end of cooking, especially before serving:
- Ingredients Soften and Meld: As vegetables soften and the beef breaks down, the stew’s overall flavor changes. What might have seemed underseasoned earlier in the cooking process could now be the perfect level of seasoning.
- Reduction of Liquid: If the stew has reduced significantly, the flavors might become more concentrated, which could lead to an overly salty or intense flavor. Tasting gives you the chance to balance this out before serving.
- Seasonings Settling: Some seasonings, especially salt, can gradually intensify over time. You may find that a stew cooked for several hours needs a bit more salt, or even a slight reduction, to reach the right flavor level.
2. What to Look for When Tasting
When tasting your beef stew, you’ll want to check for the balance of several key flavor elements:
- Salt Levels: Salt is one of the most important seasonings for enhancing the flavor of your stew, but too much can quickly overpower the dish. Taste for saltiness and adjust accordingly, adding small amounts at a time. If the stew is too salty, you can try diluting it with a little water or broth. If it’s lacking salt, add it gradually until the flavors pop.
- Acidity: Ensure that the stew has the right level of acidity from ingredients like red wine, vinegar, or tomatoes. Acidity should brighten the dish without overwhelming it. If the stew tastes too flat or rich, a small splash of vinegar or a squeeze of lemon juice can restore balance.
- Herb and Spice Balance: The herbs and spices should be present but not overpowering. Check to see if the thyme, rosemary, or bay leaves are providing a subtle backdrop of flavor without dominating. If the seasoning feels too weak, you can add more fresh herbs or a pinch of dried herbs. For spicier stews, a touch of black pepper or chili flakes can give it a little kick.
- Umami: Beef stew is all about umami, the savory depth of flavor that comes from the meat and other ingredients. If your stew tastes a bit one-dimensional, adding a splash of Worcestershire sauce, a spoonful of tomato paste, or a dash of soy sauce can bring out that savory richness.
3. How to Adjust Seasoning
Once you’ve tasted your stew and identified any areas that need tweaking, here’s how you can adjust the seasoning effectively:
- Add Salt Gradually: If the stew needs more salt, add it a little bit at a time, stirring well between each addition. Taste after each adjustment to avoid over-salting. Remember, the longer the stew simmers, the more intense the salt will become, so it’s important to taste at the right moment.
- Brighten with Acid: If the stew feels too heavy or rich, a small amount of acid (such as vinegar, lemon juice, or even a splash of red wine) can lift the flavors and restore brightness. This is especially important if your stew is mostly meat and root vegetables, which can sometimes create a heavy mouthfeel.
- Enhance with Sweetness: If the stew is too tangy or bitter, a pinch of sugar or a drizzle of honey can smooth out the sharpness. Sweetness can be a great counterpoint to the acidity, balancing the overall flavor profile.
- Freshen with Herbs: Fresh herbs can offer a burst of flavor just before serving. Adding a small handful of chopped parsley, thyme, or even basil can introduce a fresh, aromatic layer. Be mindful that dried herbs can sometimes overpower the stew, so use fresh herbs to provide a more delicate finish.
- Spice it Up: If the stew needs a bit of heat, consider adding freshly ground black pepper, crushed red pepper flakes, or a dash of hot sauce. Be careful with spicy ingredients, as they can quickly overpower the delicate flavors of the stew. Start small and taste as you go.
4. Common Pitfalls to Avoid
- Overseasoning: It’s easy to get carried away with adding salt and seasonings, but it’s essential to do so gradually. Over-seasoning can ruin the delicate balance of flavors you’ve worked hard to create. Always taste before making any significant adjustments.
- Neglecting Acidity: In some cases, cooks may focus too much on salt and spices, forgetting to check the acidity. A stew can sometimes feel flat without the brightness that acid brings, so don’t overlook this element.
- Forgetting Texture: While adjusting the seasoning, also consider the texture of the stew. If the liquid has reduced too much, you can add a bit of broth or water to bring the stew to your desired consistency without affecting the flavor too much.
5. Final Tasting Tips for the Best Beef Stew
- Resting Time: Once you’ve made your final adjustments, let the stew rest for a few minutes before serving. This allows the flavors to marry, and the seasoning can settle into the dish, making the stew taste even better.
- Serve with Garnishes: Adding fresh garnishes just before serving, such as a sprinkle of fresh herbs, grated cheese, or a dollop of sour cream, can enhance the flavor and give your stew a final touch of brightness.
By tasting and adjusting the seasoning just before serving, you ensure that your slow-cooked beef stew reaches its full potential. It’s a simple yet essential step to guarantee the flavors are perfectly balanced and that your stew is as flavorful as possible. Whether you need to add a pinch of salt, a dash of vinegar, or a hint of sweetness, this final tasting step allows you to refine your dish and make it exceptional.
Add Vegetables at the Right Time
Hard Vegetables First: Carrots, Potatoes, and Celery Go in at the Beginning
When preparing a slow cooker beef stew, one of the key steps to ensuring that your dish has the perfect texture and flavor is knowing when to add each ingredient. Hard vegetables, such as carrots, potatoes, and celery, should go into the slow cooker at the beginning. These vegetables require a longer cooking time to become tender and to infuse the stew with their natural sweetness and flavor.
1. Why Hard Vegetables Need to Go in First
Hard vegetables, also known as root or sturdy vegetables, have a dense structure that requires time to break down and soften. By adding them early in the cooking process, they have enough time to cook through properly. Here’s why timing matters:
- Longer Cooking Time: Carrots, potatoes, and celery take longer to cook than the more delicate vegetables like onions or bell peppers. Placing them in the slow cooker at the start ensures that they have enough time to soften and become tender without turning mushy.
- Flavor Infusion: As these vegetables cook, they release their natural sweetness and flavors into the broth, contributing to the overall depth of the stew. By allowing them to cook with the beef from the start, their flavors meld together, creating a rich and cohesive dish.
- Optimal Texture: If added too late, these vegetables may remain firm or undercooked, which can negatively affect the overall texture of the stew. Adding them at the beginning guarantees that they reach the desired level of tenderness by the time the stew is ready to serve.
2. Carrots: Sweet and Earthy Flavor
Carrots are one of the most popular vegetables in a beef stew due to their natural sweetness and earthy flavor. Their firm texture allows them to hold up well during long cooking times, making them an excellent choice for the slow cooker.
- Flavor Profile: Carrots release natural sugars as they cook, which helps to balance the richness of the beef and the savory herbs. This sweetness complements the beef stew’s umami flavors and adds a hint of brightness.
- Cutting Tips: To ensure even cooking, cut your carrots into uniform pieces. Larger chunks may take longer to cook, while smaller pieces can become too soft. Aim for 1-2 inch chunks, or consider slicing them into rounds or half-moons, depending on your texture preference.
3. Potatoes: Hearty and Filling
Potatoes are a staple in many beef stew recipes, offering a hearty texture and comfort food appeal. Their starchiness helps thicken the stew, making it more substantial and filling.
- Flavor Profile: Potatoes absorb the flavors of the beef and broth, creating a rich and velvety texture as they break down during cooking. They provide a mild base flavor that complements the stronger tastes of the beef, herbs, and spices.
- Choosing the Right Potatoes: When it comes to beef stew, waxy potatoes (like red potatoes or Yukon Gold) are the best choice. These types hold their shape well and won’t turn mushy during the long cooking process. Avoid using starchy potatoes (like Russets) as they tend to break down more easily and can turn the stew too thick or gooey.
- Cutting Tips: Similar to carrots, ensure that the potatoes are cut into uniform pieces so they cook evenly. Larger pieces will hold their shape better, while smaller ones will break down and help thicken the stew.
4. Celery: Subtle Crunch and Flavor
Celery adds a subtle crunch and aromatic flavor to your beef stew, acting as an essential base note in the vegetable mix. While it doesn’t take as long to cook as carrots or potatoes, it still benefits from being added at the start to allow it to soften and infuse the stew with its distinct flavor.
- Flavor Profile: Celery has a mild, slightly peppery flavor that balances the rich, savory taste of the beef. As it cooks, celery imparts a subtle earthiness to the broth, enhancing the overall complexity of the dish.
- Cutting Tips: Chop the celery into bite-sized pieces to ensure even cooking and allow the flavors to spread throughout the stew. Be sure to use both the stalks and the leaves for maximum flavor, as the leaves contribute a fresh, herbal note.
5. Timing for the Perfect Texture
Timing is crucial to achieving the perfect texture in your slow cooker beef stew. While hard vegetables should go in at the beginning, there are a few other things to consider:
- Layering: Place the hard vegetables at the bottom of the slow cooker, as they require more time to cook. This way, they’ll be in direct contact with the heat source, ensuring they cook thoroughly. Layering them at the bottom also helps to protect more delicate ingredients, such as onions and garlic, which can cook faster.
- Avoid Overcrowding: Make sure that the slow cooker isn’t overcrowded with too many vegetables. Overcrowding can trap steam and prevent proper cooking. If you have a smaller slow cooker, consider reducing the quantity of vegetables or cooking the stew in batches.
6. Benefits of Adding Hard Vegetables First
By following this approach of adding hard vegetables at the beginning, you’re giving your stew the best chance to develop rich, balanced flavors and achieve the perfect texture. These vegetables will break down and release their natural sweetness and starches into the stew, creating a hearty, flavorful broth that complements the beef. Additionally, their slow cooking time ensures that they become tender without turning mushy, preserving their shape and texture throughout the cooking process.
By adding carrots, potatoes, and celery at the start of the slow cooking process, you’re ensuring that these foundational ingredients have ample time to cook, infuse the stew with rich flavor, and develop the perfect texture. This step is crucial for building a well-rounded and satisfying beef stew that your family and friends will love.
Delicate Vegetables Later: Add Peas or Green Beans in the Last Hour
In the slow cooker, delicate vegetables like peas, green beans, and other quick-cooking ingredients should be added later in the cooking process to preserve their texture and vibrant color. Adding them too early can result in overcooking, which may turn them mushy and diminish their flavor. To keep your beef stew visually appealing and texturally balanced, the general rule of thumb is to introduce these vegetables in the last 30 minutes to 1 hour of cooking time.
1. Why Delicate Vegetables Need to Be Added Late
Delicate vegetables have a tender texture and shorter cooking time compared to hard vegetables like carrots and potatoes. Adding them early in the slow cooking process can cause them to break down too much and lose their shape, flavor, and nutritional value. Here’s why it’s crucial to time their addition properly:
- Preserving Texture: Delicate vegetables, such as peas and green beans, can become overly soft and mushy if exposed to the long cooking times required for beef stew. By adding them in the last hour of cooking, you ensure they remain crisp and tender, providing a pleasant contrast to the beef and the other vegetables.
- Maintaining Color: Many delicate vegetables, such as peas and green beans, have vibrant green colors that can fade when overcooked. Adding them later allows these vegetables to retain their fresh appearance, enhancing the visual appeal of your stew.
- Flavor Preservation: Since delicate vegetables have a naturally mild flavor, overcooking can cause them to lose their taste and blend too much into the stew’s broth. Adding them near the end ensures that their unique flavors remain intact and complement the richness of the beef.
2. Peas: Sweet and Tender
Peas are a classic addition to many beef stews, offering a sweet pop of flavor and a tender texture that balances out the dish. When added at the right time, peas contribute a fresh and slightly sweet note that contrasts with the savory and umami-packed beef.
- Flavor Profile: Peas add a natural sweetness that pairs well with the hearty beef and the earthiness of the root vegetables. Their delicate texture creates a delightful contrast to the tender beef, bringing a pleasant balance to the stew.
- How to Add Peas: Frozen peas are a great option for slow cooker beef stew. They cook quickly and retain their sweetness, making them perfect for adding in the last 30 minutes to an hour of cooking. If using fresh peas, be sure to add them at the same time to prevent overcooking.
- Timing: Stir in peas 30 minutes to 1 hour before serving to preserve their texture and sweetness. Adding them any earlier may result in mushy peas that lose their vibrant green color.
3. Green Beans: A Crisp, Fresh Addition
Green beans are another popular choice for slow cooker beef stew, providing a crunchy texture and fresh, slightly grassy flavor. They bring a refreshing contrast to the tender beef and vegetables and help lighten the dish’s richness.
- Flavor Profile: Green beans have a mildly grassy, slightly sweet flavor that balances the richness of the beef stew. Their texture adds a nice crunch and helps break up the otherwise soft consistency of the beef and root vegetables.
- How to Add Green Beans: Fresh green beans should be trimmed and cut into bite-sized pieces before adding them to the stew. For convenience, you can also use frozen green beans, which will cook in the slow cooker with ease.
- Timing: Just like peas, green beans should be added during the last 30 minutes to 1 hour of cooking time. This ensures they retain their natural crunch and color, providing both a pleasant texture and a burst of freshness to the stew.
4. Other Delicate Vegetables to Consider
In addition to peas and green beans, there are several other delicate vegetables that can be added near the end of the cooking process for a balanced stew. These vegetables typically require less time to cook and can lose their texture or flavor if overcooked.
- Corn: Fresh or frozen corn kernels can add a pop of sweetness and color to your stew. Add them in the last 30 minutes to ensure they stay tender and bright.
- Zucchini: Zucchini slices or cubes can be added for a soft, slightly sweet flavor. They cook quickly, so add them in the last 30 minutes for the best texture.
- Spinach or Kale: Leafy greens like spinach or kale wilt quickly and can be added during the final 10 to 15 minutes of cooking. These greens will retain their vibrant color and nutrients while infusing the stew with a mild, earthy flavor.
5. Tips for Adding Delicate Vegetables to Your Beef Stew
- Cut Evenly: For uniform cooking, make sure to cut delicate vegetables like peas, green beans, and zucchini into even-sized pieces. This ensures that all of the vegetables cook at the same rate and contribute evenly to the stew’s flavor and texture.
- Stir Gently: When adding delicate vegetables, gently stir them into the stew to avoid breaking them up. Over-stirring can cause the vegetables to mush and lose their shape.
- Adjust Seasoning: Since delicate vegetables can be subtle in flavor, be sure to taste your stew near the end of cooking. Adding these vegetables may slightly change the flavor profile of the broth, so you might want to adjust the seasoning with a pinch of salt, pepper, or herbs if needed.
6. Benefits of Adding Delicate Vegetables Later
By adding delicate vegetables like peas and green beans later in the cooking process, you’re ensuring that your stew has the perfect balance of textures and flavors. These vegetables contribute a fresh, crisp element that complements the hearty, tender beef, and their natural sweetness and bright color elevate the overall dish. Additionally, adding them in the final hour allows you to retain their vibrant appearance and fresh taste, creating a well-rounded and satisfying beef stew that appeals to both the eyes and the palate.
By timing the addition of delicate vegetables carefully, you ensure that your beef stew is visually appealing, well-balanced, and full of fresh, vibrant flavors. Whether you opt for peas, green beans, or other quick-cooking vegetables, adding them in the last hour of cooking will result in a perfect, crowd-pleasing stew every time.
Frozen Vegetables: Add Them in the Last 30 Minutes
Frozen vegetables are a convenient and time-saving addition to your slow cooker beef stew. However, due to their pre-cooked nature and the way they’re stored, it’s important to time their addition carefully to preserve their texture, flavor, and nutritional value. Adding frozen vegetables too early in the cooking process can lead to mushy results, as they may break down too much during the long cooking time. The key is to introduce them during the final 30 minutes of cooking to ensure they retain their shape and contribute to the stew’s balance.
1. Why Add Frozen Vegetables Later?
Frozen vegetables are harvested at their peak ripeness and quickly frozen, which helps to preserve both their flavor and nutrients. When cooked in the slow cooker for too long, these vegetables can lose their firm texture, resulting in an overly soft or mushy stew. Adding them late in the cooking process helps achieve the following:
- Retain Texture: Frozen vegetables, unlike fresh ones, have already been blanched before freezing, which means they cook faster. Adding them in the last 30 minutes ensures they maintain a slightly crisp texture, contributing to a satisfying bite and preventing them from becoming overcooked and mushy.
- Preserve Nutrients: Extended cooking times can cause nutrients, such as vitamins and antioxidants, to break down and leach into the cooking liquid. By adding frozen vegetables late in the process, you help preserve the integrity of the nutrients, ensuring your stew is not only delicious but also nutrient-dense.
- Maintain Flavor: Frozen vegetables can lose their flavor if overcooked. The goal is to enhance the existing flavors in the stew, not overwhelm them with overcooked vegetables. Adding them towards the end allows their natural flavors to infuse the stew without becoming too diluted.
2. Best Frozen Vegetables for Beef Stew
Not all frozen vegetables are suitable for slow cooking, and some may work better than others in terms of texture and flavor retention. Here are some great choices for frozen vegetables that can enhance your beef stew:
- Frozen Peas: A classic addition, frozen peas hold their shape well and add a touch of sweetness that balances the richness of beef stew. They cook quickly, so adding them in the last 30 minutes ensures they remain bright and tender.
- Frozen Green Beans: Green beans are another vegetable that works well in slow-cooked stews. When added at the end, they retain a crisp texture and vibrant color, making them a wonderful contrast to the tender beef and root vegetables.
- Frozen Corn: Sweet corn kernels bring a pop of color and a mild, sweet flavor to the stew. When added at the right time, they retain their freshness and texture, adding an enjoyable crunch to the dish.
- Frozen Mixed Vegetables: Some frozen mixed vegetable bags contain a variety of vegetables like carrots, corn, peas, and green beans, making them a convenient option. If using a mix, be sure to add them in the last 30 minutes of cooking to prevent them from becoming overly soft.
- Frozen Carrots: Pre-sliced frozen carrots can be a time-saver for busy cooks. They cook more quickly than fresh carrots, so adding them toward the end ensures they stay tender yet firm, complementing the other vegetables in the stew.
3. How to Add Frozen Vegetables to Beef Stew
Adding frozen vegetables to your slow cooker beef stew is simple, but timing and preparation are key:
- Do Not Thaw First: There’s no need to thaw frozen vegetables before adding them to your stew. In fact, adding them frozen helps them retain their shape and texture better. When they thaw, they release moisture, which could change the stew’s consistency and cause the vegetables to become mushy.
- Add in the Final 30 Minutes: Stir frozen vegetables into the stew about 30 minutes before the cooking time ends. This ensures that they warm through and cook just enough without losing their firmness.
- Stir Gently: Frozen vegetables can be a bit more fragile than fresh ones, so stir them gently to avoid breaking them apart or turning them into mush. It’s best to fold them in slowly to preserve their individual shape and texture.
4. The Benefits of Using Frozen Vegetables
There are several advantages to using frozen vegetables in your slow cooker beef stew:
- Convenience: Frozen vegetables are a huge time-saver, requiring no peeling, chopping, or washing. They’re pre-cut and ready to go, making them a great option for busy cooks looking to prepare a hearty stew without much prep work.
- Year-Round Availability: Since frozen vegetables are harvested at their peak and preserved, they’re available year-round, making it easy to incorporate seasonal vegetables like peas, corn, and green beans into your stew no matter the time of year.
- Consistency: Frozen vegetables tend to be more consistent in size and quality compared to fresh ones, which can vary in ripeness and texture. With frozen vegetables, you can be sure that each batch of stew has evenly cooked vegetables with a uniform texture.
- Cost-Effective: Frozen vegetables are often less expensive than their fresh counterparts, especially out of season. This makes them a budget-friendly option for creating large batches of beef stew.
5. Tips for Using Frozen Vegetables in Beef Stew
- Avoid Overcrowding the Slow Cooker: While frozen vegetables are convenient, be mindful not to add too many at once. Overcrowding the slow cooker can lead to uneven cooking. If needed, cook in batches and add the frozen vegetables during the last 30 minutes of the cooking time.
- Consider the Size of the Vegetables: If you’re using frozen vegetables like peas or green beans, they may come in different cuts or sizes. Make sure to add the vegetables that require the same cooking time at the same time to maintain uniformity.
- Taste and Adjust Seasoning: Frozen vegetables might not have as strong a flavor as fresh ones, so make sure to taste your stew before serving and adjust the seasoning if necessary. A dash of salt or a sprinkle of herbs might be all it takes to elevate the dish.
By timing your frozen vegetables carefully, you can enjoy a beef stew that’s full of flavor, texture, and nutrients. Adding them in the final 30 minutes ensures they stay fresh, tender, and vibrant—perfectly complementing the rich, savory beef and hearty root vegetables.
Don’t Overfill the Slow Cooker
Ideal Fill Level: 2/3 Full for Even Cooking
When cooking a slow cooker beef stew, achieving the right fill level is crucial for ensuring that your stew cooks evenly and develops optimal flavor. Overfilling or underfilling your slow cooker can affect both the cooking time and the quality of the dish. To get the best results, aim to fill your slow cooker about 2/3 full, as this allows the heat to circulate properly, ensuring even cooking throughout the dish.
1. Why 2/3 Full is Ideal
Slow cookers work by using moist heat to cook the ingredients over several hours, and achieving the right fill level ensures the heat is distributed effectively. Here’s why filling your slow cooker up to 2/3 is the best practice:
- Consistent Heat Distribution: A slow cooker works best when it has enough space for the heat to circulate around the ingredients. When the cooker is filled about two-thirds of the way, there’s enough room for the heat to move evenly across the ingredients, preventing areas from cooking too quickly or unevenly.
- Prevents Boiling Over: If the slow cooker is filled too full, the liquid may spill over during the cooking process, especially as it heats and simmers. Overfilling can create a mess and potentially reduce the effectiveness of your slow cooker. The 2/3 mark provides sufficient space to avoid this issue.
- Avoids Overcooking or Undercooking: When a slow cooker is overfilled, the ingredients at the bottom may cook faster than those on the top, leading to inconsistent textures. On the other hand, if the slow cooker is underfilled, the ingredients may not generate enough moisture or steam, causing parts of the dish to dry out or cook unevenly.
- Allows for Better Flavor Infusion: With the right amount of ingredients, the flavors have room to meld together in the slow cooker. Too many ingredients might crowd the pot and prevent the beef, vegetables, and seasonings from properly infusing each other, resulting in a less flavorful stew.
2. What Happens If You Overfill or Underfill the Slow Cooker?
While it may seem tempting to fill the slow cooker all the way to the top, or alternatively, keep it mostly empty for a smaller batch, both extremes can lead to undesirable results.
- Overfilling the Slow Cooker: When the cooker is overfilled, it can take longer for the heat to reach all areas of the pot, and some ingredients may cook faster than others, causing them to become overly tender or mushy. Additionally, if the liquid level is too high, the stew might boil instead of simmer, altering the texture and flavor. Overfilling can also prevent the slow cooker’s lid from sealing properly, causing heat to escape and extending the cooking time.
- Underfilling the Slow Cooker: If the slow cooker is too empty, the cooking time may be much shorter than expected. This could lead to undercooked vegetables or meat, especially if you’re cooking a large cut of beef that requires longer cooking times to become tender. Underfilling also means that the ingredients don’t release as much moisture, leading to a stew that may be too dry or lacking in depth of flavor.
3. How to Measure the 2/3 Full Rule
To ensure you’re filling the slow cooker to the correct level, here are some practical tips:
- Use the 2/3 Mark as a Guide: Most slow cookers have a visible line or indicator to show how full they are. If your slow cooker doesn’t have this, use the 2/3 rule as a general guideline. Simply aim to fill the cooker up to about two-thirds of its capacity, leaving the remaining space for the steam and liquid to circulate.
- Consider the Ingredients: If you’re using ingredients that release a lot of moisture (such as tomatoes or vegetables like zucchini), you might be able to slightly increase the fill level. Conversely, for ingredients that don’t release much liquid (like potatoes or meat), it’s a good idea to err on the side of caution and fill the pot closer to 1/2 full.
- Keep in Mind the Lid: Make sure that after you add your ingredients, the lid fits securely on top of the slow cooker. If the lid doesn’t fit properly, the cooking process will be less efficient, and you may lose heat, resulting in uneven cooking.
4. Adjusting for Larger or Smaller Batches
If you’re cooking a larger batch or preparing a stew for a crowd, you may need to adjust the cooking time slightly, even when following the 2/3 full rule.
- For Larger Batches: When cooking a larger batch, you may need to add extra liquid to maintain the desired consistency of the stew. More liquid helps prevent the ingredients from drying out during the longer cooking time and ensures the flavors continue to blend.
- For Smaller Batches: For a smaller batch of beef stew, you can reduce the amount of liquid or adjust the seasoning accordingly to avoid the stew becoming too watery or too salty.
5. Additional Tips for Even Cooking in a Slow Cooker
- Layering Ingredients: For best results, place denser ingredients (like potatoes, carrots, and meat) at the bottom of the slow cooker, as they take longer to cook. This will allow the heat to reach these ingredients first, ensuring they cook evenly with the other ingredients.
- Don’t Peek Too Often: Every time you lift the lid to check on your stew, you release steam, which can extend the cooking time. Resist the urge to peek unless absolutely necessary.
- Stir Once or Twice: During the cooking process, stir the stew once or twice, especially when you’re adding frozen vegetables in the last 30 minutes. This helps ensure even cooking and that the flavors have time to meld together.
By maintaining the ideal 2/3 fill level, you create a perfect environment for your slow cooker beef stew to cook evenly, develop rich flavors, and achieve the perfect texture for all your ingredients. With consistent heat circulation and just the right amount of space, your stew will turn out every time, making for a truly satisfying meal.
Use the Right Size Cooker: 6-8 Quarts is Ideal for Stew
Choosing the right size slow cooker is crucial for a perfect beef stew. A 6 to 8-quart cooker works best for even cooking and flavor development.
1. Why a 6-8 Quart Cooker Works Best for Stew
A 6 to 8-quart slow cooker provides enough space for your stew to cook evenly. Here’s why it works:
- Optimal Cooking Space: This size gives your ingredients enough room to cook properly. They won’t be overcrowded, ensuring better texture and flavor.
- Even Heat Distribution: The cooker will distribute heat evenly, allowing the stew to cook through and not dry out.
- Room for Larger Cuts of Meat: Beef stew requires cuts like chuck roast. This size accommodates those pieces without overcrowding.
2. The Problem with Smaller Cookers
Smaller cookers can cause issues like uneven cooking. Here’s why:
- Crowded Ingredients: A small cooker can overcrowd your stew. This can leave some ingredients undercooked.
- Longer Cooking Times: The heat will struggle to cook everything properly, slowing the process down.
- Insufficient Liquid: A smaller cooker might not have enough room for the liquid, making your stew dry.
3. How a 6-8 Quart Cooker Serves a Crowd
A 6-8 quart slow cooker is ideal for larger batches. It has several benefits:
- Accommodates Larger Portions: This size lets you make enough stew for family dinners or gatherings.
- Leftovers for Days: You’ll have plenty of stew left for the next day. The flavors will continue to develop.
- Perfect for Meal Prep: It’s great for preparing meals in advance. You can freeze leftovers for later.
4. When to Consider Smaller or Larger Cookers
While the 6-8 quart cooker is ideal, sometimes you need a different size:
- Smaller Cookers (3-5 Quarts): These are good for smaller batches, but they might not handle large cuts of meat.
- Larger Cookers (9+ Quarts): These can make large batches but might not heat evenly, affecting texture and flavor.
5. How to Make the Most of Your 6-8 Quart Cooker
To get the best results, follow these tips:
- Layer Ingredients: Place dense vegetables like carrots and potatoes at the bottom. Put meat and delicate veggies on top.
- Leave Room for Liquid: Avoid filling the cooker all the way. Leave space for the liquid to bubble and steam.
- Stir Occasionally: Stir halfway through cooking to ensure the flavors mix well and break up any large chunks.
6. Conclusion
A 6 to 8-quart slow cooker is perfect for beef stew. It ensures your stew cooks evenly and tastes amazing. This size is ideal for both large meals and leftovers. Follow these tips for the best results.
Make It Ahead for Better Flavor
Refrigerate Overnight: Allows Flavors to Meld
One of the secrets to a truly flavorful slow cooker beef stew is giving it time to rest after cooking. Allowing the stew to refrigerate overnight helps the flavors meld together, resulting in a deeper, richer taste. Here’s why this extra step can make a big difference:
1. The Science Behind Flavor Development
When beef stew sits overnight, the flavors continue to interact and evolve. The spices, herbs, and vegetables that you added during cooking have time to blend with the meat and broth. Here’s what happens:
- Flavor Infusion: As the stew cools in the refrigerator, the fat in the broth solidifies, which allows it to trap flavors. The herbs and spices, like thyme and rosemary, penetrate the beef and vegetables more thoroughly.
- Improved Depth: With time, the stew’s flavors deepen. What was once a fresh, new combination of ingredients becomes a harmonious symphony of tastes. Each bite becomes more complex and satisfying.
2. Tender Meat, Even More So
One of the benefits of letting stew rest overnight is the improvement in texture. The tough cuts of meat used in beef stew, like chuck roast, continue to tenderize while the stew is stored in the fridge. Here’s how:
- Collagen Breakdown: The slow cooking process already breaks down the collagen in the meat, making it tender. Allowing the stew to rest overnight gives even more time for this process to complete, ensuring the beef becomes melt-in-your-mouth tender.
- Meat Absorbs More Flavor: After sitting overnight, the meat will absorb more of the broth and seasoning, resulting in a deeper flavor profile that’s hard to achieve with just one round of cooking.
3. Better Consistency
Refrigerating your stew overnight also improves its consistency. Here’s why:
- Thickened Broth: As the stew cools, the fat in the broth solidifies, giving the stew a richer, thicker texture. This makes for a heartier meal the next day, where the broth is less soupy and more like a velvety sauce that coats the ingredients.
- Vegetable Absorption: The vegetables in your stew, particularly potatoes and carrots, have more time to absorb the flavors of the broth. This gives them a more flavorful bite compared to when they’re freshly cooked.
4. How to Reheat Your Stew
When you’re ready to enjoy the stew the next day, reheating it properly is key to preserving its flavors and texture:
- Slow and Steady: Reheat the stew gently over low to medium heat on the stovetop or in the slow cooker. This prevents the meat from becoming tough again and ensures that the flavors stay balanced.
- Add a Splash of Liquid: If the stew has thickened too much overnight, simply add a small amount of broth, stock, or even water to loosen it up to your desired consistency.
5. Tips for Storing Beef Stew Overnight
To get the most out of this step, follow these storage tips:
- Cool Before Refrigerating: Allow the stew to cool to room temperature before refrigerating. This prevents the growth of bacteria and helps maintain the integrity of the meat.
- Store in an Airtight Container: For optimal freshness and to prevent any odors from other foods in the fridge, store your stew in an airtight container. This also helps retain the moisture in the broth.
- Don’t Skip the Overnight Rest: While you might be tempted to serve the stew immediately, the flavor development that happens overnight is an essential step. It’s what turns your dish from good to great!
6. Conclusion
Refrigerating your beef stew overnight might seem like an extra step, but it’s well worth the wait. The flavors have more time to meld together, the meat becomes even more tender, and the consistency of the stew improves. It’s one of the simplest ways to elevate your dish and ensure a satisfying meal the next day. So, don’t skip this step — your taste buds will thank you!
Reheat Gently: Use Low Heat to Avoid Overcooking
Reheating slow cooker beef stew is an art. While it might seem like a simple task, doing it improperly can result in tough meat, overcooked vegetables, or a loss of flavor. To ensure your stew is just as delicious the second time around, reheat gently using low heat. Here’s why this method works and how to do it properly:
1. Why Low Heat is Crucial for Reheating Stew
Beef stew contains tender, slow-cooked meat and delicate vegetables. When reheating, it’s important to use low heat to preserve both texture and flavor:
- Prevent Tough Meat: Beef stew is often made with tougher cuts of meat like chuck roast, which become tender through slow cooking. Reheating it on high heat can cause the meat fibers to contract again, making the meat tough and chewy. By using low heat, you ensure the meat stays tender and juicy.
- Avoid Overcooked Vegetables: Vegetables like potatoes, carrots, and celery have already been cooked in the stew. High heat can turn them mushy or dry out their texture. A gentle reheat preserves their firmness and the overall consistency of the stew.
- Maintain Flavor Integrity: The slow cooking process helps to develop complex flavors. Reheating on high heat can cause the broth to reduce too quickly, altering the flavor balance and possibly making it too salty or intense. Low heat helps maintain that perfect harmony.
2. How to Reheat Beef Stew Gently
There are several methods for reheating beef stew without sacrificing quality. Here’s how to do it properly:
- Stovetop Method:
- Use a Low Flame: Pour your stew into a pot and set the stovetop burner to low or medium-low heat. Stir occasionally to make sure it heats evenly.
- Add Liquid as Needed: If the stew thickens too much while reheating, add a splash of broth, stock, or even water to adjust the consistency. Stir gently as it heats to incorporate the liquid without splashing or breaking up the vegetables.
- Cover with a Lid: Use a lid to cover the pot while reheating. This will help trap moisture, keeping the stew from drying out. Just remember to stir periodically.
- Slow Cooker Method:
- Low and Slow: If you prefer to use the slow cooker to reheat your stew, place the stew in the slow cooker and set it to low. Allow it to heat for 1-2 hours, stirring occasionally.
- Keep It Moist: To prevent the stew from drying out, add a little more liquid before reheating. This also helps with maintaining the right texture.
- Microwave Method:
- Reheat in Short Intervals: If you’re in a hurry, the microwave is an option. Place your stew in a microwave-safe container, and cover it with a microwave-safe lid or plastic wrap (leave a small gap for steam to escape). Heat in short intervals, about 1-2 minutes at a time, stirring between each interval to ensure even heating.
- Stir After Each Interval: Stirring is important to avoid hot spots and ensure the stew reheats evenly.
3. What to Avoid When Reheating Beef Stew
While reheating stew gently is key, there are certain mistakes to avoid to preserve the texture and flavor of your dish:
- Don’t Reheat on High Heat: As mentioned, using high heat can ruin the texture of the meat and vegetables. It also risks burning the bottom of the stew and creating unpleasant flavors.
- Avoid Overheating: Stew doesn’t need to be boiling hot to be safe or enjoyable. Overheating can cause the broth to reduce too much, making the stew too thick or too salty. Stick to low and slow for the best results.
- Reheating Multiple Times: Each time you reheat beef stew, it goes through a cycle of cooling and reheating that can affect both the flavor and texture. Try to reheat only the portion you plan to serve and store the rest separately to avoid overcooking.
4. Why Reheating Gently Helps the Stew Taste Better
The process of reheating at low temperatures helps retain the integrity of your stew, ensuring it tastes just as good as the first time. Here’s why:
- Flavor Preservation: Low and slow reheating helps the stew maintain its full flavor profile. Heating it too quickly or at too high a temperature can cause the flavors to become imbalanced, losing the depth of taste you originally achieved.
- Enhanced Aroma: Stews have a rich, savory aroma that comes from slow cooking. Gently reheating allows these aromas to re-emerge, making the dish smell as inviting as when it was first cooked.
5. Conclusion
Reheating beef stew is simple, but it requires patience. By using low heat and taking the time to reheat gently, you preserve the tenderness of the meat, the texture of the vegetables, and the complex flavors that make beef stew so comforting. Whether you’re reheating on the stovetop, in the slow cooker, or even in the microwave, the key is to avoid rushing the process. With this method, your stew will be just as delicious as when you first made it.
Freeze for Later: Store in Airtight Containers for Up to 3 Months
Freezing your slow cooker beef stew is a fantastic way to extend its shelf life and have a convenient, ready-made meal waiting for you on busy days. With proper storage techniques, beef stew can maintain its delicious flavor and texture for up to three months in the freezer. Here’s everything you need to know about freezing beef stew and reheating it to perfection later.
1. Why Freezing is a Great Option for Beef Stew
Freezing your beef stew allows you to enjoy the same comforting meal later without having to start from scratch. Here’s why freezing is a great option:
- Convenience: Storing beef stew in the freezer means you always have a hearty meal available, even on the busiest days. Simply reheat it and enjoy a comforting dish in no time.
- Preserves Flavor: Freezing helps lock in the stew’s flavors, ensuring that you can enjoy a meal that tastes just as delicious as when it was first cooked. The slow-cooked beef and vegetables retain their taste and texture with proper storage.
- Reduce Waste: Freezing leftover stew helps you reduce food waste. If you have extra stew after a meal, you can store it in the freezer for future use instead of letting it go to waste in the fridge.
2. How to Properly Freeze Beef Stew
Freezing beef stew isn’t just about tossing it into any container. To preserve its flavor and texture, follow these steps:
- Cool the Stew First: Before freezing, let your stew cool to room temperature. This prevents the formation of ice crystals that could negatively affect the texture of the meat and vegetables. Cooling also ensures the stew won’t raise the temperature inside the freezer, which could lead to the growth of harmful bacteria.
- Use Airtight Containers: To prevent freezer burn and preserve the stew’s quality, store it in airtight containers or heavy-duty freezer bags. When using containers, make sure they are freezer-safe and leave a little space at the top for expansion as the stew freezes. If using freezer bags, remove as much air as possible before sealing.
- Portion It Out: Consider freezing your beef stew in individual or family-sized portions. This makes it easier to thaw and reheat only the amount you need, rather than defrosting the entire batch.
- Label and Date: Always label your containers or bags with the date you froze the stew. This will help you keep track of how long it’s been in the freezer and ensure you use it within the recommended three months.
3. How Long Can Beef Stew Stay in the Freezer?
Beef stew can be safely frozen for up to three months. While it can last longer, the quality of the stew may decline after this period, and the texture of the vegetables and meat could change. To ensure you’re enjoying it at its best, try to use your frozen stew within three months for optimal flavor and texture.
4. Thawing and Reheating Frozen Beef Stew
When you’re ready to enjoy your frozen beef stew, here’s how to thaw and reheat it:
- Thaw in the Refrigerator: The best way to thaw beef stew is by moving it from the freezer to the fridge 24 hours before you plan to eat it. This slow thawing process helps preserve the stew’s texture and flavor.
- Quick Thawing Option: If you don’t have time to thaw in the refrigerator, you can thaw beef stew in the microwave. Use the defrost setting, and be sure to stir occasionally to ensure it thaws evenly.
- Reheat Gently: Reheat your thawed beef stew using low heat to prevent overcooking. You can use a stovetop, slow cooker, or microwave, as mentioned in the previous sections. Add a bit of liquid if the stew has thickened too much during freezing, and stir well before serving.
5. Tips for Freezing Beef Stew Successfully
Here are some additional tips to make sure your beef stew freezes and reheats perfectly:
- Avoid Freezing Certain Vegetables: Some vegetables, like potatoes, don’t freeze well and can become mushy when thawed. If your stew contains potatoes, consider freezing the broth and meat separately, then adding fresh potatoes when reheating.
- Add Fresh Herbs After Freezing: Fresh herbs can lose their potency after freezing. For the best flavor, consider adding fresh thyme, rosemary, or bay leaves when reheating the stew, rather than before freezing.
- Don’t Overfill Containers: When freezing beef stew, avoid overfilling containers or bags. This can lead to uneven freezing or difficulty storing multiple portions. Leave enough space for the stew to freeze evenly.
6. Conclusion
Freezing your slow cooker beef stew is a great way to extend its shelf life while preserving its rich flavor and texture. By following these simple steps—cooling the stew, using airtight containers, and portioning it out—you can enjoy a hearty meal months after it was originally made. Plus, reheating it gently ensures that the stew tastes just as good as the first time. Whether you’re planning for busy nights or simply want to reduce food waste, freezing beef stew is a smart and convenient option.
Serve with the Perfect Sides
Crusty Bread: Perfect for Soaking Up the Broth
One of the best ways to enjoy a hearty bowl of slow cooker beef stew is by pairing it with a thick slice of crusty bread. The crusty texture of the bread provides the perfect balance to the tender, melt-in-your-mouth beef and vegetables, while its ability to soak up the rich, flavorful broth takes your stew experience to a whole new level.
1. Why Crusty Bread is the Ideal Companion for Beef Stew
Crusty bread isn’t just a side—it’s an essential element that elevates the meal. Here’s why it’s the ideal choice:
- Soaks Up the Broth: The rough exterior of crusty bread absorbs the stew’s savory broth beautifully. Each bite becomes a delightful mix of the soft interior of the bread and the rich, flavorful liquid, creating the perfect harmony of textures.
- Contrasts Softness with Crunch: The firm, crisp crust of the bread contrasts nicely with the tender beef and vegetables in the stew, adding an extra layer of texture. This contrast enhances the eating experience, providing something to crunch on between bites of the stew.
- Enhances Flavor: When bread soaks up the broth, it absorbs all the wonderful flavors from the stew, which means you get to enjoy even more of the delicious beef and vegetable essence with every bite. The bread acts like a sponge, absorbing the essence of herbs, spices, and the deep, savory broth, making it the perfect complement.
2. Types of Crusty Bread That Pair Well with Beef Stew
While almost any type of bread can be enjoyed with stew, crusty bread is the best choice for soaking up all that goodness. Here are some varieties that work particularly well:
- Baguette: A classic French baguette has a crunchy crust and a soft, airy interior that makes it perfect for dipping into rich stews. Its long, slender shape makes it easy to break off pieces or toast for extra crunch.
- Sourdough: The tangy, chewy texture of sourdough bread, with its slightly sour flavor, provides a delightful contrast to the savory richness of beef stew. The robust flavor of sourdough also complements the deep, savory notes in the stew.
- Ciabatta: Known for its rustic appearance and crunchy crust, ciabatta has large air pockets in its soft interior, making it excellent for soaking up broth. Its chewy texture pairs beautifully with the tenderness of the stew.
- Italian Bread: Italian bread has a slightly chewy texture with a nice, crisp crust, making it perfect for sopping up the rich, flavorful stew. It’s neutral enough not to overpower the stew’s taste while adding its own flavor to the experience.
- Artisan Boule: A hearty, round loaf like an artisan boule offers both a thick crust and a satisfying, tender inside, ideal for soaking up the broth without falling apart too quickly. Its artisanal quality gives it a rustic touch that pairs well with the hearty stew.
3. Serving Tips for Crusty Bread with Beef Stew
To get the most out of your crusty bread when serving it with beef stew, here are some helpful tips:
- Serve It Warm: Crusty bread is best enjoyed warm. Heat it in the oven for a few minutes just before serving, and it’ll become even more inviting with its crispy crust and soft interior. You can also toast the bread lightly to add extra crunch.
- Cut It Thick: When slicing your bread, cut it into thick slices. Thicker slices are better at holding up to the stew and won’t fall apart when you dip them into the broth. It also allows for more bread to soak up the delicious flavors.
- Serve on the Side or Toasted: You can serve crusty bread on the side to let guests dip it into their stew as they eat. Alternatively, toast the bread slices, then rub them with a cut garlic clove for extra flavor. This makes for an excellent accompaniment to the stew.
- Top It Off with Butter or Herbs: For an added treat, spread a thin layer of butter on the bread before serving. You can also sprinkle it with fresh herbs like parsley or thyme for extra flavor, which complements the herb-infused stew.
4. Crusty Bread vs. Soft Bread: Why Crusty is the Winner
While soft bread may be tempting, it lacks the texture and sturdiness needed to hold up against the rich stew. Here’s why crusty bread wins the battle:
- Better for Dipping: Soft bread tends to disintegrate when dipped into broth, making it less practical for soaking up the stew. Crusty bread, on the other hand, remains intact, allowing you to enjoy the stew without the bread falling apart.
- More Flavorful: Crusty bread often has a more complex, slightly roasted flavor due to the baking process, adding an extra layer of taste to the dish. Soft bread lacks this depth and often doesn’t provide the same contrast to the stew’s richness.
- Better Texture: The crunch of crusty bread offers a pleasing texture contrast to the soft, tender beef and vegetables in the stew. This contrast adds to the overall eating experience, making every bite more enjoyable.
5. Final Thoughts: Crusty Bread as the Perfect Stew Companion
In conclusion, crusty bread is an essential component of enjoying a slow cooker beef stew. Not only does it help soak up the delicious broth, but it also enhances the flavor and texture of the dish, making it even more satisfying. Whether you choose a baguette, ciabatta, or sourdough, the crusty bread serves as the perfect vehicle for delivering all the stewy goodness to your taste buds. For the best experience, make sure to serve it warm, cut thick, and enjoy it as the perfect complement to your hearty, flavorful beef stew.
Mashed Potatoes: A Classic Pairing
When it comes to pairing side dishes with slow cooker beef stew, few combinations are as timeless as mashed potatoes. This classic pairing is not only comforting but also enhances the flavors of the stew in a way that’s simple yet perfect. The creamy texture and mild taste of mashed potatoes balance the rich, savory depth of the beef stew, making it an ideal accompaniment to the dish.
1. Why Mashed Potatoes Work So Well with Beef Stew
Mashed potatoes and beef stew have a natural synergy that has made this combination a beloved comfort food pairing for generations. Here’s why mashed potatoes are the perfect match:
- Absorbs the Broth: The creamy texture of mashed potatoes makes them excellent for soaking up the flavorful stew broth. Each spoonful of stew comes with a scoop of mashed potatoes, allowing you to enjoy the rich flavors of the beef and vegetables while the potatoes provide a velvety contrast.
- Balances Richness: Beef stew can sometimes be quite rich, with its hearty meat and flavorful sauce. The mild, creamy potatoes offer a subtle flavor that balances out the stew’s heaviness. The potatoes’ soft texture provides a nice contrast to the tender, chunky pieces of beef.
- Comforting Texture: Mashed potatoes are known for their comforting, smooth consistency. The rich, velvety texture of well-made mashed potatoes complements the tender beef and soft vegetables in the stew, making every bite a satisfying experience.
2. How to Make Perfect Mashed Potatoes for Beef Stew
The key to a great pairing with beef stew is making sure your mashed potatoes are both creamy and flavorful. Here’s how to prepare mashed potatoes that are perfect for soaking up the stew’s broth:
- Choose the Right Potatoes: Start with starchy potatoes, such as Russet potatoes or Yukon Golds. These varieties yield a fluffy, smooth mash that’s ideal for pairing with beef stew. Russets are particularly good for creating a light, airy texture, while Yukon Golds offer a slightly richer, buttery flavor.
- Cook Properly: Boil your potatoes in salted water to ensure they are well-seasoned before mashing. To keep them from becoming waterlogged, make sure to drain the potatoes thoroughly once they’re cooked. Let them sit for a minute or two to allow any excess moisture to evaporate.
- Add Cream and Butter: For extra richness and smoothness, add a generous amount of butter and heavy cream to the potatoes. You can also use sour cream for added tang or cream cheese for extra creaminess. The key is to balance the fat with enough creaminess to ensure the potatoes absorb the stew broth without becoming too dry or too heavy.
- Season Well: Season your mashed potatoes with salt, pepper, and other complementary herbs, such as garlic powder, chives, or parsley. This ensures that the potatoes are flavorful on their own, but not overpowering the stew’s rich flavors.
3. Creative Variations for Mashed Potatoes
While classic mashed potatoes are always a hit, there are many creative variations you can try to give your mashed potatoes a new twist:
- Garlic Mashed Potatoes: For a savory kick, add roasted garlic or sautéed garlic to your mashed potatoes. The rich, caramelized flavor of garlic enhances the earthy flavors of the potatoes and pairs beautifully with the beef stew.
- Cheese Mashed Potatoes: Incorporating cheese, such as cheddar, Parmesan, or Gruyère, into your mashed potatoes adds extra richness and depth. The melted cheese blends seamlessly into the potatoes, offering a creamy texture and savory flavor that complements the stew.
- Herb-Infused Mashed Potatoes: Fresh herbs like thyme, rosemary, or chives can be incorporated into the mashed potatoes to add a burst of fresh flavor. The subtle herb notes enhance both the potatoes and the beef stew, creating a more complex pairing.
- Mashed Potato Variations: For a different texture and flavor profile, try smashed potatoes, where the potatoes are left a bit chunkier, or sweet potatoes for a touch of sweetness. The natural sugars in sweet potatoes offer a pleasant contrast to the savory stew.
4. Tips for Serving Mashed Potatoes with Beef Stew
To make your meal truly irresistible, here are some tips for serving mashed potatoes alongside your beef stew:
- Serve Warm: Mashed potatoes are best when served warm. You can keep them warm in a slow cooker or covered dish while the stew is cooking. Alternatively, reheat them gently on the stovetop with a splash of milk or cream to restore their creamy texture.
- Layer the Dish: For a beautiful presentation, place a scoop of mashed potatoes in the center of the bowl and ladle the beef stew over the top. This creates a perfect balance of stew and potatoes in every bite.
- Serve as a Side or Mix Together: You can either serve the mashed potatoes as a side dish or mix them directly into the stew. If you choose to mix them in, the potatoes will absorb even more of the stew’s flavors, creating a rich, comforting one-pot meal.
5. Final Thoughts: Why Mashed Potatoes Are the Ultimate Pairing for Beef Stew
In conclusion, mashed potatoes are the ultimate side dish for slow cooker beef stew because they complement the stew’s rich flavors while offering a satisfying contrast in texture. Whether you stick with the classic creamy mash or experiment with new flavors, mashed potatoes are always a hit and elevate the meal. Their ability to absorb the savory broth, balance the richness of the beef, and provide comfort makes them the perfect companion to a bowl of beef stew.
Steamed Greens: Adds a Fresh Contrast
While slow cooker beef stew is rich, hearty, and full of deep, savory flavors, steamed greens provide the perfect contrast, offering a fresh and vibrant note that helps balance the heaviness of the stew. The lightness and subtle bitterness of steamed greens add a refreshing element to the meal, making each bite feel well-rounded and complete.
1. Why Steamed Greens Complement Beef Stew
Adding steamed greens as a side dish to your beef stew creates a harmonious contrast in both texture and flavor. Here’s why these greens make an excellent addition:
- Lightens the Meal: Beef stew can be quite rich, with its tender meat and flavorful broth. Steamed greens, being lighter in both taste and texture, cut through this richness, preventing the meal from feeling too heavy. They provide a refreshing change of pace with each bite, helping to cleanse the palate and make the dish feel more balanced.
- Enhances Flavors: Steamed greens help bring out the natural flavors of the beef stew. Their slightly bitter and earthy notes complement the deep umami flavors of the beef, while their subtle taste doesn’t overpower the stew’s richness. This makes them the perfect foil to the robust stew, offering a pleasant contrast.
- Textural Contrast: While the beef and vegetables in the stew are tender and soft, the steamed greens add a slight crispness and bite. This contrast in texture makes for a more exciting and dynamic eating experience, giving a welcome variation to the otherwise soft stew.
2. Best Greens to Steam with Beef Stew
When choosing which greens to steam, it’s important to pick varieties that provide the right balance of flavor and texture without overwhelming the dish. Here are some excellent choices:
- Spinach: Spinach is a tender, mild green that pairs wonderfully with beef stew. Its delicate texture and earthy flavor add just the right amount of contrast to the rich stew without being too bitter or overpowering. Steaming spinach quickly helps it retain its vibrant green color and fresh taste.
- Kale: Kale is a hearty, slightly bitter green that stands up well to the bold flavors of beef stew. It’s also rich in nutrients, making it a healthy choice. When steamed, kale softens but still maintains a bit of texture, offering a pleasant chew alongside the tender beef.
- Swiss Chard: Swiss chard is another great option with slightly sweet, earthy flavors and colorful stems that add a visual appeal to your plate. Its tender leaves cook well with steam, providing a mild but flavorful contrast to the beef stew.
- Collard Greens: If you’re aiming for a more robust flavor, collard greens are a fantastic choice. They are a little tougher than other greens, but they hold up well during steaming and absorb the savory flavors from the stew without losing their integrity.
- Broccoli: Although not technically a leafy green, broccoli florets are an excellent vegetable to steam as a side to beef stew. Its subtle bitterness and crunchy texture add variety to the meal, while also soaking up some of the stew’s broth, enhancing its flavor.
3. How to Steam Greens for Beef Stew
The process of steaming greens is quick and easy, ensuring you retain their vibrant color and nutritional value while enhancing their flavor. Here’s how to steam them properly:
- Prepare the Greens: Wash the greens thoroughly to remove any dirt or grit. For tougher greens like kale and collard greens, remove the thick stems and tear the leaves into manageable pieces. For tender greens like spinach and Swiss chard, you can leave the leaves whole.
- Steaming Method: You can steam greens using a traditional steamer basket or by placing them in a colander over a pot of simmering water. Cover the pot with a lid, allowing the steam to cook the greens until they’re tender but still bright green. This usually takes about 3 to 5 minutes, depending on the type of green.
- Avoid Overcooking: One of the key factors in achieving perfect steamed greens is not overcooking them. Overcooking can cause them to lose their vibrant color and become mushy. Aim for a quick steam that leaves the greens tender yet still slightly firm, so they maintain their texture and flavor.
- Season Lightly: Steamed greens can be seasoned with a pinch of salt, a drizzle of olive oil, or a squeeze of lemon juice to enhance their natural flavor. You can also add a sprinkle of garlic powder or a dash of red pepper flakes for a bit of extra seasoning if desired.
4. Creative Variations of Steamed Greens
If you want to add an extra twist to your steamed greens, consider these creative variations:
- Garlic-Infused Steamed Greens: Adding a bit of minced garlic to your steaming water or sautéing it in olive oil before tossing it with your steamed greens can infuse them with extra flavor. The garlic pairs particularly well with more bitter greens like kale and collard greens.
- Lemon and Parmesan: For a zesty, savory twist, drizzle your steamed greens with fresh lemon juice and sprinkle with grated Parmesan cheese or Parmesan alternatives. The acidity from the lemon and the umami from the cheese work in harmony with the stew.
- Bacon or Pancetta: For an indulgent touch, consider adding crumbled bacon or crispy pancetta to your steamed greens. The salty, smoky bits enhance the flavor of the greens and add an extra layer of richness that pairs well with the beef stew.
5. Serving Steamed Greens with Beef Stew
To serve your steamed greens with beef stew:
- Layer the Dish: Place a generous helping of steamed greens on the side of your stew, allowing the rich broth to mingle with the greens. The heat from the stew will lightly warm the greens, making them a great complement to the dish.
- Mix Together: For a more integrated meal, you can stir the steamed greens directly into the stew during the last few minutes of cooking. This allows the flavors to meld, and the greens will absorb some of the stew’s rich broth, enhancing their flavor.
- Garnish: Garnish your greens with fresh herbs like parsley or basil for an added touch of freshness. This enhances the visual appeal and adds an aromatic note to the overall dish.
6. Final Thoughts: The Benefits of Steamed Greens with Beef Stew
Steamed greens provide a refreshing and nutritious contrast to the rich, savory flavors of slow-cooked beef stew. Whether you choose spinach, kale, or collard greens, they add not only a burst of color to the plate but also a healthy, flavorful balance that complements the stew’s hearty nature. The combination of tender beef, flavorful vegetables, and fresh greens creates a satisfying and well-rounded meal that’s sure to please everyone at the table.
For more ideas on delicious side dishes to complement your slow cooker beef stew, check out this article on the best side dishes to serve with beef stew.
Conclusion: The Perfect Pairing for a Hearty Beef Stew
A well-made slow cooker beef stew is an undeniably comforting meal, full of rich, savory flavors. However, pairing it with sides like steamed greens can elevate the dish to a new level. The vibrant, slightly bitter greens provide a refreshing contrast to the stew’s depth, lightening the meal and offering a delightful balance in both flavor and texture.
Whether you choose spinach, kale, or collard greens, steaming them perfectly ensures that they retain their color and nutrients while complementing the beef stew’s robust flavors. By adding a touch of lemon, garlic, or even bacon, you can infuse the greens with additional layers of taste that enhance the entire meal.
As you plan your next batch of beef stew, don’t forget to add some steamed greens to the mix. This pairing will not only boost the flavor but also add a healthy, fresh element to your comforting dish. Enjoy your meal with the perfect balance of richness and lightness, and your guests are sure to be impressed by the harmony of flavors.