
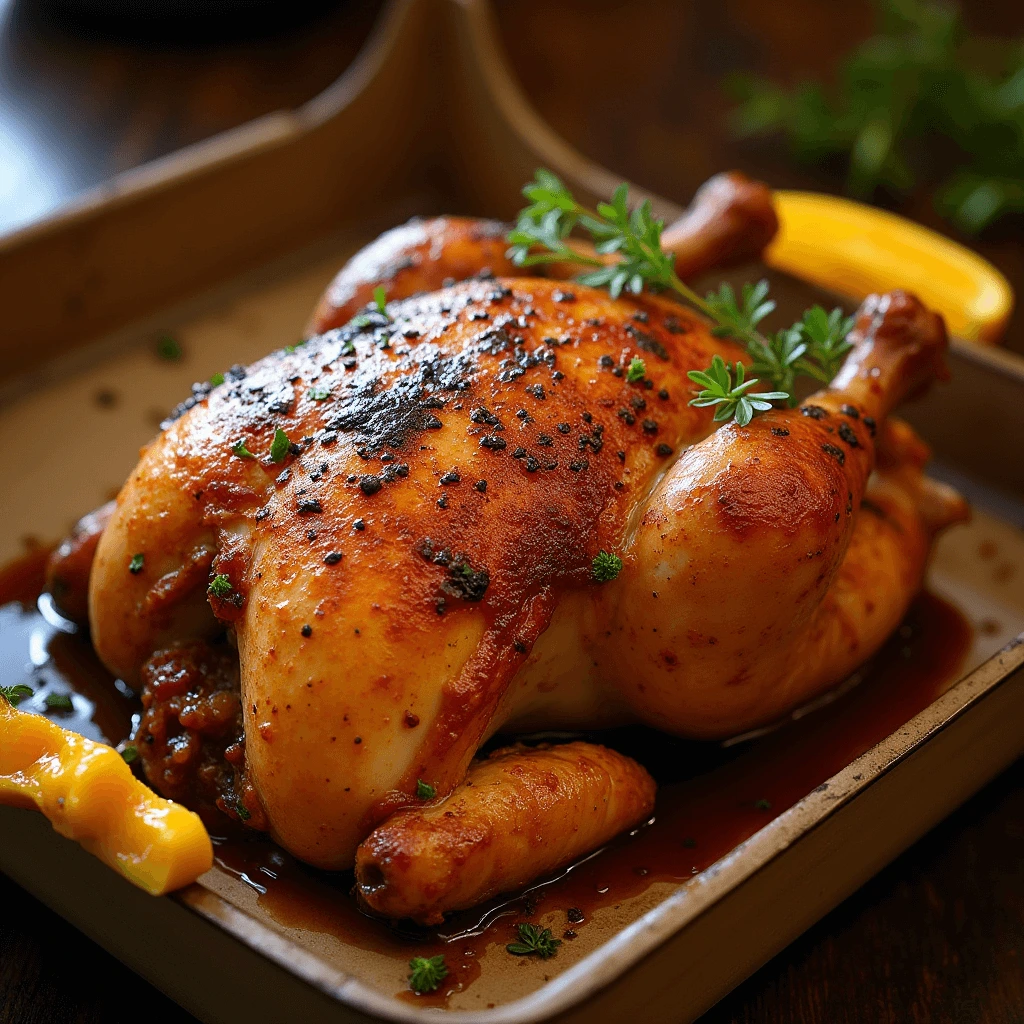
Craving a dish that’s both comforting and full of flavor? Try braised chicken in the oven with crispy skin. This recipe gives you juicy, tender chicken with rich flavors from slow braising. The skin, crispy and golden, adds the perfect crunch to each bite.
The secret to crispy skin lies in braising the chicken in the oven. It cooks slowly, absorbing the seasonings, and finishes with a burst of heat to achieve that perfect crisp.
This easy recipe will help you make restaurant-quality chicken at home. Impress your family and guests with this flavorful, satisfying dish!

What is Braised Chicken and Why It Works for Crispy Skin
Definition of Braising
Braising is a cooking method that involves slow-cooking meat in a small amount of liquid. This technique helps tenderize tougher cuts, like chicken thighs, by breaking down the connective tissue over low heat. When done right, the meat becomes juicy and flavorful.
The process starts by browning the meat in oil or butter. This step adds flavor and creates a rich crust. Next, you add the braising liquid, such as chicken stock or wine. You should pour enough liquid to come halfway up the sides of the meat, but not cover it completely.
Once the liquid is added, cover the pot and cook the meat slowly. The heat allows the meat to absorb the flavors of the liquid while becoming tender. After braising, you may finish the dish with high heat. This final step crisps the skin, adding texture and flavor.
Braising is a versatile method that yields both tender meat and rich, complex flavors. It’s perfect for dishes like braised chicken with crispy skin, where you get the best of both worlds: juicy, flavorful meat and a satisfying crunch.
Benefits of Braising Chicken in the Oven
Braising chicken in the oven has several benefits, from convenience to enhanced flavor. It’s an ideal method for busy home cooks who want a flavorful meal with minimal effort. Oven braising delivers tender, juicy chicken with crispy skin and rich flavors.
Convenience of Oven Braising
Oven braising is highly convenient. Unlike stovetop braising, which requires constant attention, oven braising lets you set it and forget it. Once the chicken is browned and the liquid is added, the oven does the rest. You can focus on other tasks while the chicken cooks.
The oven also provides even, consistent heat. This ensures the chicken cooks evenly and stays juicy. You don’t need to check on it constantly, making this method perfect for busy days.
Flavor Development Through Slow Cooking
Oven braising enhances the flavor of chicken. As it cooks in the braising liquid, the chicken absorbs flavors from garlic, onions, herbs, and spices. This slow cooking method allows flavors to meld together, creating a deep, savory taste.
The liquid also helps keep the chicken moist and tender. Any vegetables or aromatics in the liquid break down, adding more flavor to the dish.
Achieving Perfectly Crispy Skin
Oven braising allows for tender meat and crispy skin. Start by braising the chicken at low heat, then finish with a high-heat blast to crisp the skin. The slow cooking locks in moisture, while the final high heat creates a golden, crispy skin.
Hands-Off Cooking
Oven braising is a hands-off method. After preparing the chicken and adding the liquid, you can leave it to cook. This allows you to focus on other aspects of your meal or relax while the chicken cooks. It’s perfect for busy nights or when you’re entertaining guests.
Versatility and Easy Cleanup
Braising works with many chicken cuts, including thighs, drumsticks, or whole chicken. You can customize the braising liquid with wine, stock, or tomatoes. Plus, since it’s a one-pot method, cleanup is easy and quick.
In short, oven braising is convenient, flavorful, and versatile. It results in tender, juicy chicken with crispy skin, making it a perfect dish for any occasion.
Achieving Perfectly Crispy Skin with the Braising Method
One of the most desirable outcomes when braising chicken is achieving that golden, crispy skin. The key to perfectly crispy skin lies in the technique, as braising alone doesn’t typically create a crispy texture. The process requires careful timing, temperature control, and a few important steps to ensure the skin becomes crispy while the chicken stays tender and moist. Here’s how you can get the crispy skin you desire when braising in the oven.
Step 1: Brown the Skin First
Before braising the chicken, it’s essential to brown the skin. Start by searing the chicken in a hot pan with oil or butter, skin-side down. This helps develop a flavorful, caramelized crust on the skin, which is the foundation for getting it crispy later. Browning the skin also locks in juices, making the meat tender and keeping the skin from becoming soggy during the slow cooking process.
Step 2: Use the Right Amount of Liquid
When braising, you want to add just enough liquid to the pot to cover the chicken about halfway, not submerging it completely. Too much liquid can prevent the skin from crisping up, as it will stay moist and steam rather than roast. A good rule of thumb is to use a flavorful braising liquid, like chicken stock, wine, or a mixture of both, which enhances the flavor while maintaining the right balance of moisture.
Step 3: Slow Cook the Chicken in the Oven
Once the chicken is browned and the liquid is added, cook it in the oven at a low temperature. Slow-braising in the oven allows the chicken to absorb the flavors of the braising liquid while the skin remains protected. This gentle cooking method keeps the chicken juicy and tender, ensuring that the meat becomes succulent and flavorful, without the risk of drying out.
Step 4: Finish with High Heat for Crispy Skin
Here’s the crucial step for crispy skin: after braising the chicken for the majority of the cooking time, increase the oven temperature to finish the dish. Uncover the chicken and raise the heat to 400°F (200°C) or higher. The high heat will help the skin crisp up quickly, giving it a golden, crunchy texture. During this phase, the skin will release excess moisture and caramelize, forming a perfect crispy crust.
It’s important to monitor the chicken during this stage to avoid burning the skin. A few minutes at high heat is all you need to achieve that irresistible crispy texture.
Step 5: Let the Chicken Rest
After removing the chicken from the oven, let it rest for a few minutes before serving. This allows the juices to redistribute in the meat and helps prevent the skin from losing its crispiness too quickly. Letting the chicken rest ensures that you get both tender meat and crispy skin with each bite.
Why the Technique Works
The braising method offers a unique advantage for achieving crispy skin. The slow cooking in the liquid makes the chicken incredibly tender, while the final high-heat step allows the skin to become crispy. This two-step process—slow cooking and finishing with high heat—gives you the best of both worlds: juicy meat and perfectly crispy skin. By following this technique, you can confidently achieve a balanced, flavorful braised chicken with golden, crispy skin every time.
In summary, getting crispy skin while braising chicken in the oven is all about using the right technique. By searing the skin first, controlling the liquid amount, slow-cooking the chicken, and finishing with high heat, you can achieve that perfect, golden crispy skin you desire without sacrificing tenderness.
Essential Ingredients for Braised Chicken with Crispy Skin
Choosing the Right Cut of Chicken
When braising chicken in the oven, choosing the right cut of chicken is crucial for achieving the best results in terms of both flavor and texture. While many cuts can be used for braising, chicken thighs and drumsticks stand out as the ideal choices for this cooking method. Here’s why these cuts work so well for a braised chicken recipe, especially when aiming for a tender interior and crispy skin.
Chicken Thighs: The Perfect Balance of Flavor and Moisture
Chicken thighs are widely regarded as one of the best cuts for braising, and for good reason. They are rich in fat, which helps keep the meat juicy and tender during the slow-cooking process. Unlike chicken breasts, which can dry out if overcooked, thighs have a higher fat content, which provides both moisture and flavor.
The slow braising process allows the fat in the thighs to break down, infusing the meat with flavor and ensuring a moist, succulent result. Additionally, chicken thighs have more connective tissue, which turns tender and flavorful as it braises in the liquid. This makes them ideal for this cooking method, as they hold up well during long cooking times without losing texture.
Drumsticks: Juicy and Full of Flavor
Chicken drumsticks are another excellent choice for braising, particularly when you want a hearty, flavorful dish. Like chicken thighs, drumsticks contain more fat than chicken breasts, which makes them juicy and flavorful after braising. The dark meat of the drumsticks also holds up better to slow cooking, absorbing the flavors from the braising liquid and remaining tender.
Drumsticks have the added benefit of bone-in structure, which enhances the flavor profile of the dish. The bone adds richness to the braising liquid, which is then absorbed by the meat. This creates a deeper, more complex flavor, especially when braising for extended periods.
Why Dark Meat Works Best for Braising
Both chicken thighs and drumsticks are considered dark meat cuts. Dark meat is inherently more forgiving when braising because of its higher fat content and greater ability to retain moisture. The long cooking process of braising doesn’t dry out dark meat as easily as it does white meat, like chicken breasts. This makes thighs and drumsticks ideal choices for braised chicken recipes, where you want the chicken to remain moist, tender, and packed with flavor.
Bone-In vs. Boneless
Another important consideration is whether to choose bone-in or boneless cuts. Bone-in thighs and drumsticks work best for braising because the bones help retain moisture and contribute to the overall flavor. The bone marrow and connective tissues in the bones add richness to the braising liquid, making the dish even more flavorful.
While boneless cuts like skinless thighs may be convenient, they lack the depth of flavor that bone-in cuts provide. For the most flavorful braised chicken with crispy skin, bone-in thighs and drumsticks are your best option.
Why Skin-On is Essential
When braising, it’s also important to use skin-on chicken thighs or drumsticks. The skin helps protect the meat from the braising liquid and allows the chicken to retain its moisture. It also provides the perfect texture contrast when finished with a crispy, golden skin. The skin acts as a barrier, keeping the meat tender while also allowing you to achieve that coveted crispy skin at the end of the cooking process.
Conclusion
In summary, chicken thighs and drumsticks are the best cuts for braising due to their higher fat content, tender dark meat, and ability to absorb the flavors of the braising liquid. Whether you choose thighs or drumsticks, bone-in and skin-on cuts will give you the most flavorful and juicy results, while also ensuring that you can achieve crispy skin at the end. By choosing the right cut, you set the foundation for a successful braised chicken dish that’s both tender and full of flavor.
The Importance of Seasonings and Herbs
The seasoning and herbs you use in a braised chicken recipe can make or break the dish. The right combination of herbs and spices enhances the flavors of the chicken, the braising liquid, and even the crispy skin, creating a well-rounded, savory meal. Key ingredients like rosemary, thyme, garlic, and paprika are not only flavorful but also add depth to the overall taste. Here’s why these specific ingredients are essential for braising chicken in the oven and how they work to elevate your dish.
Rosemary: A Robust, Earthy Herb
Rosemary is a bold, aromatic herb known for its pine-like fragrance and robust flavor. It pairs exceptionally well with chicken, especially when braised, as its strong flavor can stand up to the richness of the meat and the slow-cooked braising liquid. Its earthy notes infuse the chicken, adding a savory complexity that makes the dish feel heartier and more aromatic.
Both fresh and dried rosemary can be used. Fresh sprigs can be tucked into the braising liquid or placed under the chicken skin, while dried rosemary can be sprinkled directly onto the chicken or mixed with other seasonings. Either way, this herb enhances the flavor of both the chicken and the braising liquid, making it an essential addition to the recipe.
Thyme: Subtle, Woody Flavors for Balance
Thyme brings a delicate, woody flavor to the table, and it’s a perfect match for braised chicken. Its subtle, earthy taste balances out the stronger herbs like rosemary, allowing all the flavors to complement each other. As it braises, thyme releases its oils into the liquid, infusing the chicken and vegetables with a mild, savory flavor.
Fresh thyme sprigs or dried thyme can be added early in the cooking process to ensure the herb has enough time to release its aromatic oils. The mild flavor of thyme creates a harmonious background that enhances the overall dish.
Garlic: A Savory, Aromatic Punch
Garlic is another essential ingredient that adds richness and depth to a braised chicken recipe. As it cooks, garlic infuses both the chicken and the braising liquid with a savory sweetness and mild spiciness. Its complex flavors enhance the dish without overpowering the other ingredients.
You can use whole garlic cloves, smashed or chopped garlic, or even garlic powder. Whole cloves can be added to the braising liquid to infuse the dish with flavor, while minced or chopped garlic can be used to season the chicken directly for a more concentrated taste. Regardless of how you use it, garlic adds an undeniable richness to the braised chicken.
Paprika: A Sweet and Smoky Kick
Paprika brings a subtle sweetness and smokiness to the dish, adding both color and flavor. The spice complements the savory qualities of the chicken and enhances the crispy skin. It works particularly well with garlic and herbs like thyme and rosemary, giving the dish a layered, smoky richness.
Sweet paprika offers a mild, aromatic flavor, while smoked paprika imparts a deeper, more intense smokiness. Either type of paprika can be used depending on your taste preferences, but both add a beautiful color and a warm, smoky undertone to the dish.
Layering Flavors for Maximum Impact
The key to braising chicken is layering flavors. By combining rosemary, thyme, garlic, and paprika, you create a balanced and harmonious profile that enhances every bite. These ingredients not only enrich the chicken but also infuse the braising liquid, contributing to the overall flavor complexity.
Add these herbs and spices at different stages to allow each one to release its full flavor potential. Season the chicken before browning to create a flavorful crust with garlic and paprika, and let rosemary and thyme infuse the braising liquid during the slow cooking process. This layering technique results in a rich, aromatic dish.
Conclusion
Rosemary, thyme, garlic, and paprika are essential for creating a flavorful braised chicken. These ingredients provide depth and complexity, enhancing both the meat and the braising liquid. By using these seasonings, you’ll create a tender, juicy chicken dish with crispy skin and rich, aromatic flavors.
Braising Liquids for Flavor
Braising is a slow-cooking method that relies not only on the right technique but also on the braising liquid to enhance the flavor of the chicken. The liquid you choose plays a pivotal role in infusing the meat with moisture and flavor during the cooking process. A well-balanced braising liquid can elevate the dish, adding depth and richness to both the chicken and the surrounding vegetables. There are several options when it comes to choosing the right braising liquid, and common choices include chicken stock, olive oil, and wine. Each of these ingredients brings its own unique character to the dish.
Chicken Stock: A Rich and Savory Base
Chicken stock is arguably the most traditional and widely used braising liquid for chicken. It has a rich, savory flavor that perfectly complements the natural taste of the chicken, creating a hearty and flavorful foundation for the braising process. The stock’s depth of flavor is a result of simmering chicken bones, vegetables, and seasonings, which results in a flavorful liquid that infuses the chicken as it braises.
When using chicken stock for braising, opt for a high-quality stock—preferably homemade or low-sodium to control the salt content. The savory notes from the stock penetrate the meat, making it tender and delicious while enhancing the flavor of the braising liquid itself. As the stock reduces during the slow-cooking process, it intensifies, thickening into a rich sauce that can be served over the chicken and accompanying vegetables.
If you’re aiming for a more intense flavor, consider using bone broth instead of regular stock. Bone broth is made by simmering bones for a much longer period, extracting even more collagen and nutrients, which results in a richer, more robust liquid. This can add a layer of comfort to your braised chicken, creating a truly satisfying dish.
Olive Oil: A Flavorful Fat for Richness
Olive oil is another fantastic braising liquid, particularly when combined with other ingredients like herbs, garlic, and onions. Its smooth texture and mild flavor enhance the chicken without overpowering the other seasonings. While olive oil doesn’t provide the same depth of flavor as stock, it brings a luscious richness to the dish, making it a great choice for recipes where you want to retain the natural flavors of the chicken.
When using olive oil for braising, consider drizzling it over the chicken before browning it. This will create a beautiful golden crust on the chicken, while the olive oil seeps into the meat, helping it stay moist during the braising process. Olive oil also has the advantage of being neutral enough to pair well with various herbs and spices, so it allows the flavors of rosemary, thyme, garlic, and paprika to really shine through.
For a more pronounced olive flavor, extra virgin olive oil is your best bet. Its fruitier and more robust flavor profile can complement Mediterranean-style seasonings, such as lemon, olives, or capers, and enhance the overall taste of your braised chicken.
Wine: A Sophisticated Touch
Wine is a more sophisticated and flavorful braising liquid that can elevate your dish with its complexity. Red or white wine can add acidity, sweetness, and depth, balancing the richness of the chicken and creating a flavorful sauce as it reduces. The choice between red or white wine depends on the overall flavor profile you’re aiming for.
- Red Wine: For a heartier, more robust braise, red wine works beautifully. It adds a depth of flavor that complements dark meats like chicken thighs or drumsticks, creating a savory, full-bodied sauce. The tannins in red wine also help break down the meat, making it even more tender and flavorful as it cooks. A dry red wine, such as Cabernet Sauvignon or Merlot, is ideal for braising as it adds complexity without being overly sweet.
- White Wine: If you prefer a lighter, more delicate flavor, white wine is an excellent choice. It adds brightness and acidity to balance the richness of the chicken. A dry white wine like Chardonnay or Sauvignon Blanc can lend a slightly fruity or citrusy note, which complements the savory herbs and spices in the braising liquid. White wine also helps tenderize the chicken, infusing it with its subtle flavors.
In addition to using wine as a braising liquid, it can be combined with chicken stock or olive oil for a more complex liquid that brings together the best of both worlds. The wine’s acidity also helps cut through the richness of the braised chicken, making for a well-rounded dish.
Herb-Infused Braising Liquids
To take your braising liquid to the next level, consider infusing your liquid with fresh herbs and aromatics. Rosemary, thyme, garlic, and onions are common additions that not only enhance the flavor but also give your braising liquid a fragrant aroma. The herbs release their oils into the liquid, which then infuses the chicken with even more depth of flavor.
You can add the herbs to the braising liquid before it starts cooking, allowing them to meld into the dish over time. Some people also prefer to create herb sachets, tying fresh herbs in a piece of cheesecloth or kitchen twine, so they can be easily removed once the braising process is complete.
Adjusting the Braising Liquid for Texture and Flavor
As your braised chicken cooks, you may notice the braising liquid reducing and thickening. If you want to achieve a thicker, richer sauce, you can allow the liquid to cook down further. Alternatively, if you prefer a lighter sauce, you can add a bit more stock or wine as needed. Taste the braising liquid periodically and adjust the seasoning to ensure the flavors are balanced. A splash of vinegar or lemon juice at the end can brighten the flavors and cut through any richness in the dish.
Conclusion
The choice of braising liquid—whether chicken stock, olive oil, or wine—plays a crucial role in enhancing the flavor of your braised chicken. Each liquid offers its own unique flavor profile, contributing to the richness, depth, and complexity of the dish. By carefully selecting the right braising liquid and adjusting it during the cooking process, you can create a perfectly balanced and flavorful chicken dish that’s tender, juicy, and bursting with savory goodness.
Step-by-Step Guide to Making Braised Chicken in the Oven
Preparing the Chicken
Preparing the chicken properly before braising is crucial to ensuring it turns out flavorful, tender, and with that perfectly crispy skin. The way you season and handle the chicken will have a significant impact on the overall outcome of the dish. In this section, we’ll explore tips and techniques to help you prepare the chicken for braising, ensuring that every bite is as delicious as possible.
1. Choosing the Right Chicken Cut
When it comes to braising, not all chicken cuts are created equal. Chicken thighs and drumsticks are generally the best choices for this method, as they are more forgiving and tend to become tender and juicy when cooked slowly. These cuts have a higher fat content than chicken breasts, which helps them remain moist during the long cooking process.
Chicken breasts can be used for braising as well, but they tend to dry out more easily, so extra care is required to prevent them from becoming tough. For the crispiest skin, it’s also important to use skin-on, bone-in chicken. The skin will help retain moisture and, with the right technique, become golden and crispy as the chicken braises.
2. Drying the Chicken for Crispy Skin
One of the most important steps in preparing the chicken for braising is to ensure the skin is as dry as possible before browning. Patting the chicken dry with paper towels helps to remove excess moisture, which is key to getting a crispy skin. When there’s less moisture on the skin, it can sear and crisp up more effectively during the initial browning process.
If you have time, you can also leave the chicken uncovered in the refrigerator for several hours or overnight. This will allow the skin to dry out further, which can significantly improve its crispiness once it hits the heat.
3. Seasoning the Chicken
Seasoning is essential to developing layers of flavor in the chicken. Start by generously seasoning both the skin and the flesh of the chicken with salt and freshly ground black pepper. Salt helps to draw out moisture from the skin, allowing it to crisp up while also seasoning the meat from the inside out.
For added flavor, consider using a variety of herbs and spices. Common braising seasonings include rosemary, thyme, garlic powder, paprika, and onion powder. You can create a dry rub by mixing these spices together and rubbing them evenly over the chicken’s surface. Be sure to season under the skin as well to ensure that the flavors penetrate the meat during cooking.
If you prefer a more complex seasoning, marinating the chicken before cooking can add another layer of flavor. A simple marinade made from olive oil, lemon juice, garlic, and herbs can enhance the natural flavors of the chicken, especially when left to marinate for several hours or overnight.
4. Browning the Chicken Before Braising
Browning the chicken before braising serves two important purposes. First, it helps to develop rich, caramelized flavors in the meat, which enhances the overall taste of the dish. Second, it helps to achieve that coveted crispy skin. To properly brown the chicken, heat a heavy-bottomed skillet or Dutch oven over medium-high heat and add a bit of oil (olive oil or vegetable oil works well).
Once the oil is hot, place the chicken skin-side down in the pan. Allow it to cook undisturbed for a few minutes to develop a golden-brown, crispy skin. Don’t rush this process—be patient, and make sure the skin is well-browned before flipping the chicken over. You can also brown the other sides of the chicken to add even more depth of flavor.
5. Adding Aromatics and Additional Seasonings
Before transferring the chicken to the oven or braising pot, consider adding aromatics such as onions, garlic, shallots, or leeks to the pan. These will infuse the chicken and braising liquid with additional layers of flavor during the cooking process.
For instance, once the chicken is browned, remove it from the pan, and sauté the aromatics in the rendered chicken fat until softened. You can also add some fresh herbs, like sprigs of thyme, rosemary, or bay leaves, to enhance the flavor of the braising liquid.
6. Searing the Chicken for Flavor Development
Searing the chicken is more than just a way to get crispy skin—it’s also an important technique for flavor development. As the chicken browns, it creates a layer of fond (caramelized bits) at the bottom of the pan. This fond is packed with concentrated flavor, which will later be incorporated into the braising liquid, adding complexity to the sauce.
To achieve a perfect sear, make sure your pan is hot enough and the chicken pieces aren’t overcrowded. If needed, brown the chicken in batches to ensure there’s enough space between the pieces for even browning.
7. Consider the Chicken’s Temperature
Before braising, you can also consider bringing the chicken to room temperature for more even cooking. If you’ve just pulled the chicken from the refrigerator, let it sit for 15-20 minutes to take the chill off. This ensures the chicken cooks more evenly in the oven and helps to maintain its tenderness.
8. Optional Step: Letting the Chicken Rest Before Braising
Some chefs recommend letting the chicken rest after seasoning and before browning. Resting the chicken allows the salt to draw out moisture, which can later be reabsorbed into the meat, resulting in juicier, more flavorful chicken. Resting also gives time for the seasonings to penetrate deeper into the meat, enhancing its flavor profile.
9. Final Preparation
Once the chicken is properly seasoned, dried, and browned, it’s ready to be placed in the braising liquid. Ensure that the chicken pieces are partially submerged in the liquid for maximum flavor absorption. This will allow the braising process to tenderize the meat, while the skin, if properly seared, will maintain a crispy texture.
Conclusion
Proper preparation of the chicken is key to achieving a flavorful, tender, and crispy braised dish. Drying the skin, seasoning generously, and browning the chicken before braising are essential steps to ensuring a delicious outcome. By following these tips, you’ll enhance the flavor and texture of the chicken, creating a mouthwatering dish that is sure to impress.
Braising the Chicken
Braising is the heart of the cooking process that transforms your chicken into a flavorful, tender dish. The slow-cooking technique, which involves cooking the chicken in liquid at a low temperature for an extended period, is ideal for making the meat fall-off-the-bone tender while enhancing the flavor of both the chicken and the braising liquid. In this section, we’ll go over how to properly braise the chicken in a cast-iron skillet or any other oven-safe dish for the best results.
1. Choosing the Right Braising Vessel
The first step in the braising process is selecting the appropriate cooking vessel. Cast-iron skillets, Dutch ovens, and other oven-safe pans with heavy lids are all excellent choices for braising. The key to braising is ensuring the chicken is partially submerged in the liquid while allowing the lid or cover to trap moisture, which helps keep the chicken juicy while it cooks.
- Cast Iron Skillet: Known for its ability to retain heat evenly, a cast-iron skillet is an ideal choice. It ensures that the heat is distributed uniformly, leading to consistent braising and helping the skin stay crispy.
- Dutch Oven: A Dutch oven is another fantastic option for braising, particularly for larger cuts of chicken or whole chickens. It’s deep enough to hold the chicken and braising liquid while providing ample space for airflow, which helps develop rich, concentrated flavors.
- Oven-Safe Baking Dish: If you don’t have a cast-iron skillet or Dutch oven, a standard oven-safe baking dish or a roasting pan with a lid can also work. Just be sure it’s large enough to fit the chicken comfortably without crowding, as this can affect the cooking process.
2. Preparing the Braising Liquid
Before braising, it’s crucial to prepare the braising liquid, which will not only help cook the chicken but also enhance the flavors. The liquid can be a combination of several ingredients, depending on the desired flavor profile. For this recipe, a mixture of chicken stock, wine, and herbs works beautifully, creating a savory, aromatic base that complements the chicken.
- Chicken Stock: The foundation of the braising liquid, providing richness and moisture. It ensures that the chicken remains tender and infuses the meat with savory flavors. You can use homemade stock for a richer taste, or store-bought if you’re short on time.
- Wine (Optional): Adding wine, such as white wine or even red wine for a deeper flavor, contributes acidity and complexity to the braising liquid. The alcohol will cook off, leaving behind a rich, fragrant liquid.
- Herbs and Aromatics: Fresh rosemary, thyme, garlic, onion, and bay leaves are common additions to the braising liquid. These ingredients help infuse the chicken with a variety of savory flavors. You can also add a touch of lemon juice or zest to provide a hint of freshness.
Mix these ingredients together and pour them into your chosen braising vessel, ensuring there’s enough liquid to cover about one-third to one-half of the chicken. This will allow the chicken to cook slowly, absorbing the flavors from the liquid while also becoming tender.
3. Placing the Chicken in the Braising Vessel
Once your chicken has been browned and the braising liquid is ready, it’s time to place the chicken in the cooking vessel. Nestle the chicken pieces skin-side up into the braising liquid. Ensure the skin is facing upwards to allow it to crisp up as the chicken braises in the oven.
If you’re braising a whole chicken, you can carefully place it breast-side down for the initial stage of cooking to allow the dark meat to cook faster and get more flavor from the braising liquid. After about half of the cooking time, you can flip the chicken to ensure the skin crisps up beautifully.
4. Cooking the Chicken in the Oven
Now that the chicken is in place, it’s time to braise it. Preheat your oven to a low temperature, typically between 325°F and 350°F (163°C to 177°C). Low and slow cooking is the secret to tender chicken, so resist the urge to turn the heat up high. The slow cooking time allows the chicken to absorb the flavors from the braising liquid while maintaining moisture.
- Cooking Time: Depending on the size and cut of the chicken, braising typically takes between 1.5 to 2.5 hours. Bone-in chicken thighs or drumsticks may require around 1.5 hours, while a whole chicken could take up to 2 hours or more.
- Checking for Doneness: The chicken is done when the meat is fork-tender and easily pulls away from the bone. For larger pieces, a meat thermometer can help—ensure the internal temperature reaches 165°F (74°C) for safe consumption.
5. Final Stages of Braising: Achieving Crispy Skin
While braising is a slow process, getting that crispy skin requires a final step to ensure the skin doesn’t get soggy from the braising liquid. Here’s how to achieve that perfectly crispy skin:
- Remove the Chicken from the Braising Liquid: Once the chicken is cooked through and tender, remove it from the braising liquid. Place it on a separate tray or skillet.
- Crisp the Skin Under the Broiler: Preheat your broiler on high and place the chicken under the broiler for about 5-10 minutes. Keep an eye on it to ensure the skin crisps up nicely without burning. The broiler’s high heat helps achieve that golden, crispy finish while still retaining the moisture from the braising.
Alternatively, you can return the chicken to the cast-iron skillet or Dutch oven and cook it uncovered for the last 10-15 minutes in the oven at a higher temperature. This will allow the skin to crisp while the meat remains moist and tender.
6. Basting and Monitoring the Liquid Levels
While braising, it’s important to monitor the chicken’s progress and baste it occasionally. Basting involves spooning the braising liquid over the chicken to keep it moist and infuse it with flavor. This is especially important for large cuts of chicken or whole chicken, as it ensures the chicken doesn’t dry out during the long cooking time.
- Baste every 30 minutes: Use a spoon or baster to drizzle the braising liquid over the chicken, which helps enhance its flavor and moisture content.
- Check the Liquid Level: If the liquid begins to reduce too much during the braising process, add a bit more chicken stock or water to ensure the chicken remains partially submerged. This will keep the braising process intact.
7. Resting the Chicken
Once the chicken is fully braised and the skin is crispy, let it rest for a few minutes before serving. Resting allows the juices to redistribute within the meat, ensuring that every bite is tender and moist.
Conclusion
Braising chicken in the oven is a simple but effective method to create flavorful, juicy chicken with crispy skin. By using the right cooking vessel, braising liquid, and oven settings, you can create a dish that is both delicious and satisfying. With a few tips, such as basting and finishing under the broiler, you’ll have perfectly braised chicken with crispy skin every time.
Crisping the Skin
Achieving perfectly crispy skin on braised chicken is a crucial final step in the cooking process. While braising is primarily about tenderizing the meat and infusing flavor, the skin requires special attention to ensure it turns golden and crispy. This section will walk you through the step-by-step process to crisp the skin during the oven braising process, including the techniques and ingredients that work best.
1. Initial Braising and Cooking
Before you focus on the crispy skin, it’s essential to let the braising process do its work. Braising the chicken in a flavorful liquid ensures that the meat becomes tender and succulent, but at this stage, the skin will still be soft and soggy from the moisture in the braising liquid. The goal is to cook the chicken at a low temperature to ensure tenderness without worrying about crispiness just yet.
- Set the Oven Temperature: For braising, a temperature of 325°F to 350°F (163°C to 177°C) is ideal. This low and slow cooking process ensures the chicken cooks evenly and retains moisture.
- Cook the Chicken Until Tender: The chicken should cook for 1.5 to 2 hours, depending on the size and cut, until the meat is tender and the juices run clear when pierced with a fork. By this point, the chicken will have absorbed much of the braising liquid’s flavors, but the skin will still need extra attention to become crispy.
2. Preparing the Chicken for Crisping
After the chicken is fully braised and tender, it’s time to focus on making the skin crispy. Here are the essential steps:
- Remove the Chicken from the Liquid: Carefully take the chicken out of the braising liquid, placing it on a separate plate or tray. Let any excess liquid drip off, as too much moisture on the skin will prevent it from crisping up.
- Pat the Skin Dry: Gently pat the skin with paper towels to remove any remaining moisture. The drier the skin, the crispier it will become when exposed to high heat. Even a small amount of moisture can cause the skin to steam rather than crisp, so take this step seriously.
3. Adding Fat for Crispiness
For perfectly crispy skin, fat is your best friend. Adding fat to the skin before it’s exposed to high heat helps promote a golden, crunchy texture. You have a couple of options when it comes to adding fat:
- Olive Oil: A light drizzle of olive oil will coat the skin and allow it to crisp up as it finishes cooking. Olive oil is a great option for a mild flavor, and it also helps promote browning.
- Butter: Butter is a wonderful choice for adding richness and flavor to the skin. It melts into the chicken skin, promoting even crisping. You can use clarified butter for a higher smoke point, which helps achieve a crispier result without burning.
- Other Fats: You can also use duck fat or ghee, which have higher smoke points and will help the skin crisp up beautifully without burning. Duck fat, in particular, is ideal for rich, flavorful chicken.
To apply, drizzle a tablespoon or so of fat evenly over the skin and rub it gently to coat the surface. You don’t need a lot—just enough to create a thin, even layer.
4. High Heat at the End: Using the Broiler
The key to crispy chicken skin is finishing it off with a blast of high heat. This is where the skin will really start to brown and become crispy. After the chicken has been braised to tenderness, follow these steps to crisp the skin:
- Preheat the Broiler: Turn on your broiler to high heat and let it preheat for a few minutes. The broiler is perfect for giving the skin a crisp, golden finish.
- Position the Chicken: Place the chicken under the broiler, skin-side up, in a broiler-safe pan or on a baking tray. Position the pan on the top rack of your oven, as close to the broiler as possible. This will expose the chicken to direct, intense heat, allowing the skin to crisp quickly.
- Monitor the Skin: Keep a close eye on the chicken while it’s under the broiler. It can go from perfectly crispy to burnt very quickly. After about 5-10 minutes, the skin should start to bubble and turn golden brown. You can baste the skin with more butter or oil during this stage for an extra layer of crispiness and flavor.
- Rotate if Necessary: If your broiler doesn’t heat evenly, you may need to rotate the chicken halfway through. This ensures the skin crisps up uniformly on all sides.
5. Final Check for Crispiness
Once the chicken is golden and crispy, take it out of the oven. Let the chicken rest for a few minutes to allow the juices to redistribute. The crispy skin should be the perfect contrast to the tender, flavorful meat beneath.
6. Optional: Using a Cast-Iron Skillet for Final Searing
For those using a cast-iron skillet for braising, you can skip the broiler and opt for a quick, high-heat sear on the stovetop. After removing the chicken from the braising liquid, heat the skillet over medium-high heat with a little bit of fat. Once the pan is hot, place the chicken skin-side down and cook for a few minutes until the skin crisps up. This method also adds a beautiful, caramelized crust to the chicken, making it even more delicious.
7. Rest the Chicken Before Serving
After the skin is crispy and golden brown, let the chicken rest for a few minutes before serving. This ensures that the meat retains its juices and stays tender while you enjoy that irresistible crispy skin.
Conclusion
Crisping the skin of braised chicken is the final step that elevates the dish from deliciously tender to perfectly golden and crispy. By using the right techniques—patting the skin dry, adding fat, and finishing with high heat under the broiler or on the stovetop—you can achieve a beautiful contrast of crispy skin and tender, juicy chicken.

Tips for Perfectly Braised Chicken with Crispy Skin Every Time
Temperature Control
Temperature control is vital for achieving perfect braised chicken with crispy skin. The right oven temperature ensures the chicken cooks evenly, stays juicy, and gets crispy skin at the end.
1. Oven Temperature for Braising
Braising requires low and slow cooking. The oven temperature should be between 325°F and 350°F (163°C to 177°C). This helps break down collagen in the chicken, making it tender and flavorful. If the oven temperature is too high, the chicken might dry out. If it’s too low, the skin won’t crisp properly.
2. High Heat for Crispy Skin
After the braising is complete, raise the oven temperature to 400°F (204°C). This high heat helps crisp up the skin. Bake for 5-10 minutes to achieve a golden, crispy exterior without overcooking the meat.
3. Using a Meat Thermometer
A meat thermometer helps you check the chicken’s internal temperature. Chicken should reach 165°F (74°C) at the thickest part, usually the thigh. Using a thermometer ensures the chicken is fully cooked and safe to eat.
4. Avoiding Overcooking
To prevent dry chicken, use the thermometer to avoid overcooking. Once the chicken hits 165°F, remove it from the oven. This guarantees the meat is tender and juicy while you crisp up the skin.
5. Resting Period
Let the chicken rest for a few minutes after removing it from the oven. This helps the juices redistribute and keeps the meat moist. It also allows the skin to set, staying crispy.
6. Tips for Better Temperature Control
- Use an Oven Thermometer: To ensure your oven maintains a steady temperature, use an oven thermometer.
- Avoid Opening the Door: Each time you open the oven door, the temperature drops, affecting the cooking process. Keep it closed when possible.
- Preheat Your Oven: Always preheat the oven before adding the chicken. This helps maintain the right temperature from the start.
Conclusion
Control the temperature carefully for perfect braised chicken with crispy skin. Maintain the ideal temperature for braising, use a thermometer to check doneness, and finish with high heat to crisp the skin. These steps ensure a perfectly cooked and flavorful dish.
Resting the Chicken After Cooking
Resting the chicken after cooking is an often overlooked, yet crucial, step in the process of preparing perfectly braised chicken with crispy skin. While it may seem tempting to cut into the chicken immediately after it comes out of the oven, allowing it to rest can dramatically enhance both the flavor and texture of the meat. This section will explore why resting the chicken is so important and how it affects the final result.
1. Allowing the Juices to Redistribute
One of the most significant reasons to let chicken rest is to allow the juices to redistribute throughout the meat. During the cooking process, the heat causes the muscle fibers in the chicken to contract, squeezing out moisture. If you cut into the chicken immediately, all those juices will escape, resulting in dry, less flavorful meat.
- The Resting Process: Resting gives the chicken time to cool slightly and for the muscle fibers to relax. As they relax, the juices are reabsorbed into the meat, ensuring that the chicken remains moist and flavorful. This results in a tender bite that’s full of juicy goodness, rather than dry, tough meat.
2. Ensuring Moisture Retention
Chicken that is sliced right after cooking often appears dry. Resting allows the meat to retain more moisture. The proteins in the meat contract during the cooking process, but when the chicken is removed from the heat, they relax. This relaxing process gives the chicken time to redistribute its moisture and settle, making each bite juicier.
- How It Affects Texture: Resting also plays a key role in texture. The longer the chicken rests, the more it will soften. If you skip this step, you may find the chicken to be stringy or rubbery, especially with cuts like the breast.
3. Enhancing the Flavor
The resting period also enhances the flavor of the chicken. As the juices redistribute throughout the meat, they help concentrate the natural flavors that were developed during the braising process. Additionally, the seasonings, herbs, and spices used during cooking get absorbed more evenly across the meat, resulting in a well-rounded taste.
- The Impact of Resting on Seasoning: When the chicken rests, the seasoning penetrates deeper into the meat. The flavors are not only on the surface but also spread throughout, giving a more flavorful bite in every piece.
4. How Long Should You Let the Chicken Rest?
The ideal resting time for chicken varies depending on the size and cut. Generally, you should let the chicken rest for 5-10 minutes after removing it from the oven. For larger cuts, like whole chickens or thick thighs, you may want to rest it for up to 15 minutes to ensure the juices redistribute properly.
- Covering the Chicken: If you’re concerned about the chicken cooling too much during the resting period, you can loosely cover it with foil. This will help retain warmth without trapping moisture inside, which could make the skin soggy.
5. Resting and Crispy Skin
Resting doesn’t just benefit the meat—it also helps keep the skin crispy. After the high-heat phase in the oven, the skin becomes beautifully crispy. Letting the chicken rest allows the skin to firm up further, preventing it from becoming soggy when sliced or plated.
- The Role of Resting in Crispy Skin: While the skin is still hot, the resting period helps it maintain its crispiness. Cutting into it too soon can cause the skin to lose its texture. Allowing the chicken to rest for a short time ensures that the skin stays crunchy while the meat remains juicy.
6. How to Rest Braised Chicken Correctly
- Resting on a Wire Rack: For the best results, rest the chicken on a wire rack instead of directly on a plate. This allows air to circulate around the chicken, preventing the bottom from becoming soggy.
- Avoiding Over-Resting: While resting is important, don’t rest the chicken for too long. Resting it for over 20 minutes can cause the chicken to cool down too much, making it less enjoyable to eat. It’s best to aim for a medium resting period based on the size of the chicken.
Conclusion
Resting the chicken after cooking is an essential step for enhancing both its flavor and texture. It allows the juices to redistribute, retains moisture, and results in a more flavorful and tender piece of meat. The resting period also helps maintain crispy skin, ensuring that your braised chicken is both juicy and perfectly textured when served. Don’t skip this step—it makes all the difference in achieving the best possible results.
Customizing with Vegetables and Sides
Braising chicken in the oven offers a fantastic opportunity to add a variety of vegetables and sides to enhance both the flavor and nutrition of the meal. When cooked together, vegetables absorb the savory flavors of the chicken and braising liquid, resulting in a delicious, well-rounded dish. Here’s how to incorporate vegetables and sides into your braised chicken recipe.
1. Braising Vegetables with the Chicken
Braising vegetables with the chicken is a great way to create a one-pan meal that requires little extra effort. As the chicken cooks, the vegetables soften and soak up the flavorful braising liquid, making them just as delicious as the chicken.
- Carrots: Carrots are a natural choice for braising with chicken. Their natural sweetness complements the savory chicken, and their firm texture allows them to hold up during the slow cooking process. Cut the carrots into thick pieces to ensure they don’t become too soft. They will caramelize slightly, adding a rich flavor.
- Onions: Onions are another excellent addition. They break down during the braising process, becoming soft and sweet, which adds depth to the overall dish. Slice the onions into wedges or chunks, and they’ll absorb the flavors from the chicken and the braising liquid.
- Garlic: Whole garlic cloves can be added to the pan for an aromatic boost. As they cook, garlic becomes milder and sweeter, offering a delicious contrast to the savory chicken.
2. Other Vegetables to Consider
Several other vegetables work wonderfully when braised with chicken. They not only add flavor but also make the dish more colorful and nutritious.
- Potatoes: Baby potatoes or chunks of larger potatoes are great for braising. They soak up the flavors of the braising liquid and cook to tender perfection. The starch from the potatoes also helps thicken the sauce, creating a richer gravy-like consistency.
- Parsnips: Parsnips are similar to carrots but have a slightly nutty, earthy flavor. Their firm texture allows them to hold up well during braising and they pair beautifully with chicken.
- Leeks: Leeks are a milder, sweeter alternative to onions. They add a delicate, savory note and soften beautifully in the braising liquid.
- Mushrooms: Mushrooms are perfect for soaking up the savory juices. Their meaty texture makes them an excellent complement to chicken, adding depth and umami.
3. Creating a Balanced Meal with Sides
In addition to braised vegetables, you can serve your chicken with a variety of sides that complement the rich flavors of the braising liquid.
- Rice: A simple side of rice, whether white, brown, or wild, pairs well with braised chicken. The rice will absorb the flavorful juices, making it the perfect accompaniment to the tender chicken and vegetables.
- Polenta: Creamy polenta is another wonderful side dish for braised chicken. Its soft, cornmeal-based texture works well with the savory chicken and its braising liquid.
- Bread: A loaf of crusty bread or dinner rolls is ideal for soaking up the delicious juices from the braised chicken. A baguette, sourdough, or garlic bread would all work wonderfully.
4. Layering Flavors with Herbs and Seasonings
Incorporating fresh herbs and seasonings into the vegetables can elevate the overall flavor of the dish. When braising with the chicken, use herbs like thyme, rosemary, or bay leaves to flavor both the chicken and the vegetables simultaneously.
- Thyme and Rosemary: These herbs are classic pairings with braised chicken. Add them to the pan early in the braising process, so their flavors infuse both the chicken and the vegetables.
- Bay Leaves: Bay leaves are perfect for braising, adding a subtle depth to the flavor. Drop a few into the braising liquid to enrich the overall taste.
5. Tips for Braising Vegetables with Chicken
- Size Matters: Cut vegetables into uniform sizes so they cook evenly. Larger chunks will hold their shape better, while smaller pieces will soften and blend with the braising liquid.
- Layering the Ingredients: Start by placing the vegetables at the bottom of the pan, then add the chicken on top. This ensures the vegetables cook in the braising liquid and absorb all the flavors.
- Consider Cooking Time: Harder vegetables like carrots and potatoes may take longer to cook than more delicate ones like onions or mushrooms. Add them to the pan at the appropriate time to ensure everything cooks to perfection.
Conclusion
Customizing your braised chicken with vegetables and sides not only adds flavor but also enhances the meal’s visual appeal and nutritional value. Whether you braise carrots, onions, garlic, or potatoes, these vegetables will absorb the delicious flavors of the braising liquid. Serve your braised chicken with rice, polenta, or crusty bread to create a balanced, comforting meal that’s perfect for any occasion.
Troubleshooting Common Issues in Braised Chicken Recipes
Why the Skin Isn’t Crispy Enough
Achieving perfectly crispy skin when braising chicken in the oven can sometimes be tricky. Even with the right technique, there are several common mistakes that can prevent the skin from crisping up as it should. In this section, we’ll explore some of these pitfalls and how to avoid them, ensuring your chicken has that golden, crispy finish you’re craving.
1. Not Using High Heat at the Right Time
One of the most common mistakes when braising chicken is not using high heat at the right time. Braising is a slow cooking method that combines both low and high heat for different purposes. While the slow braising portion tenderizes the chicken and infuses it with flavor, the high heat is essential for crisping up the skin.
- Why High Heat Matters: The high heat at the end of the braising process is what makes the skin crispy. The skin needs to be exposed to heat directly, usually around 425°F to 450°F (220°C to 230°C), to render the fat and crisp up. Without this burst of high heat, the skin may stay soft or even soggy due to the moisture released during braising.
- The Solution: To avoid this, ensure that you finish your braise in a preheated oven at high heat. For best results, after your chicken has cooked through and become tender, increase the oven temperature for the final 15-20 minutes of cooking to allow the skin to crisp up. You can also use the broiler briefly to help achieve a crispy finish, but watch closely to prevent burning.
2. Choosing the Wrong Cut of Chicken
Not all cuts of chicken are ideal for braising and achieving crispy skin. The skin’s ability to crisp up is partly dependent on the cut you choose. While chicken breasts are lean and cook quickly, they don’t work as well for achieving crispy skin when braised.
- Why Chicken Thighs and Drumsticks Are Best: Chicken thighs and drumsticks are fattier cuts with skin that holds up better under the braising process. The fat in these cuts helps the skin become crispier because it renders during cooking, allowing the skin to dry out and crisp up nicely. Thicker skin from these cuts also ensures a more substantial texture.
- The Solution: Stick to bone-in, skin-on chicken thighs or drumsticks. These cuts have the right balance of fat and skin to allow for crispy skin, even after the slow cooking process.
3. Not Patting the Skin Dry
Moisture is the enemy of crispy skin. If the skin of the chicken is too wet when placed in the oven, it can turn out soft rather than crispy. This is often overlooked, but moisture trapped in the skin prevents the rendering of fat, leading to a soggy texture.
- Why Dry Skin is Important: Dry skin allows the fat to render more effectively, which is key to achieving that crisp, golden exterior. If the skin is damp or wet when the chicken enters the oven, the moisture will evaporate, causing the skin to steam rather than crisp.
- The Solution: Before you begin cooking, pat the skin of the chicken dry with paper towels. This simple step removes any excess moisture, helping the skin crisp up properly during the braising process.
4. Overcrowding the Pan
Another common mistake is overcrowding the pan with too much chicken or vegetables. When there’s too much in the pan, the chicken pieces are too close together, trapping steam and preventing the skin from becoming crispy. This is especially true if you’re braising vegetables alongside the chicken.
- Why Overcrowding Hurts Crispiness: When the pan is overcrowded, the skin doesn’t have enough room to breathe, causing it to steam rather than roast. The chicken pieces need space for the hot air to circulate around them, allowing the skin to render and crisp.
- The Solution: Ensure that there’s enough space between each chicken piece in the pan. If necessary, braise the chicken in batches, or use a larger pan to allow air to circulate freely. This will give the skin the opportunity to become crispy and golden.
5. Not Using Enough Fat
Fat is key to getting crispy chicken skin. While the chicken will render some fat naturally during the cooking process, adding additional fat to the pan can help accelerate the crisping process.
- Why Fat Is Essential: Fat helps the skin cook evenly and aids in the rendering process, allowing the skin to become crispier. Without enough fat, the skin may turn out dry and tough, or fail to crisp at all.
- The Solution: Consider adding a bit of oil, butter, or even chicken fat to the pan before braising. This extra fat will help crisp up the skin and give it a beautiful golden hue.
6. Not Monitoring the Skin During the Final Stages of Cooking
Finally, some cooks make the mistake of not closely monitoring the chicken during the final stages of the cooking process. Once the braising liquid is mostly absorbed and the chicken is nearly done, you need to pay extra attention to the skin.
- Why Monitoring Is Crucial: If the chicken is left unattended during the high-heat phase, the skin can easily burn or become too dark without crisping. On the other hand, if the chicken isn’t cooked long enough at high heat, the skin won’t crisp up properly.
- The Solution: Keep an eye on the chicken during the last 15-20 minutes of cooking. You can increase the temperature or even use the broiler to give the skin a final crisp. Be sure to check frequently to avoid burning.
Conclusion
If your braised chicken’s skin isn’t as crispy as you’d like, it’s likely due to one of these common mistakes. By using high heat at the right time, selecting the right cut of chicken, patting the skin dry, not overcrowding the pan, adding enough fat, and monitoring the chicken during the final stages of cooking, you can ensure that your chicken comes out with perfectly crispy skin every time. Follow these tips and you’ll be on your way to delicious, golden-brown chicken with a satisfying crunch!
Chicken Is Dry or Tough
One of the most frustrating issues when cooking braised chicken is when the meat turns out dry or tough. While braising is known for producing tender, juicy chicken, improper technique can easily lead to the opposite result. In this section, we’ll discuss the key factors that contribute to dry or tough chicken and provide tips on how to avoid overcooking to ensure your chicken stays tender and moist.
1. Overcooking the Chicken
One of the primary reasons for dry or tough chicken is overcooking. When chicken is cooked for too long, the muscle fibers contract excessively and the moisture is squeezed out, resulting in dry meat. Since braising involves cooking the chicken slowly in liquid, it’s especially important to keep track of the cooking time and temperature.
- Why Overcooking Happens: Overcooking can occur if the chicken is left in the oven for too long, or if the heat is too high, causing the chicken to cook too quickly and dry out. While braising is meant to be a slow process, there’s still a window for optimal doneness.
- The Solution: To avoid overcooking, monitor the chicken closely towards the end of the braising process. If you’re unsure about the cooking time, consider using a meat thermometer to check the internal temperature. Chicken should be cooked to an internal temperature of 165°F (74°C). Once it reaches this temperature, remove the chicken from the oven to avoid further cooking.
2. Not Using Enough Liquid
When braising chicken, you’re relying on the liquid to provide moisture to the meat, which helps to tenderize it. If the liquid level is too low, the chicken may not cook properly and could become dry or tough. Insufficient liquid can also lead to a lack of flavor infusion, which can make the chicken seem dry even if it’s technically cooked through.
- Why Lack of Liquid Matters: The braising process requires enough liquid to submerge or partially cover the chicken, allowing it to cook slowly and evenly. If there isn’t enough liquid, the chicken will dry out as it cooks, resulting in a tough texture.
- The Solution: Make sure that you use enough braising liquid to cover the chicken, especially if you’re braising larger pieces like thighs or drumsticks. Chicken stock, broth, or wine are excellent choices for braising, as they help keep the chicken moist and flavorful. You can always add more liquid if it evaporates too quickly during the cooking process.
3. Cooking at Too High of a Temperature
While it’s important to use high heat at the end of the braising process to crisp up the skin, cooking the chicken at too high of a temperature throughout the braising can cause it to dry out and become tough. High heat can quickly evaporate the moisture in the chicken, making it less tender.
- Why High Heat Hurts Chicken: Chicken, especially bone-in cuts, benefits from low and slow cooking in the braising process. Excessive heat during the braise can lead to the protein fibers contracting too much, which results in a dry and tough texture.
- The Solution: Braise the chicken at a moderate temperature, usually between 325°F (163°C) and 375°F (190°C). This allows the meat to cook slowly and absorb moisture from the braising liquid. Once the chicken is nearly done, you can increase the temperature to crisp the skin, but the cooking process should be gentle to maintain moisture and tenderness.
4. Not Letting the Chicken Rest After Cooking
It can be tempting to slice into the chicken right after it comes out of the oven, but cutting into it too soon can result in juices escaping and leaving the meat dry. Letting the chicken rest after braising is crucial for maintaining moisture.
- Why Resting Is Important: Resting the chicken after cooking allows the juices to redistribute throughout the meat. If you slice into it too soon, the juices will escape, leaving the chicken dry and tough. Resting helps to preserve the chicken’s natural moisture, making each bite tender and juicy.
- The Solution: Allow the chicken to rest for 5 to 10 minutes after you remove it from the oven. Cover it loosely with foil to retain heat while it rests. This short resting period ensures that the juices settle back into the meat, giving you a moist and tender result.
5. Using the Wrong Cut of Chicken
Not all chicken cuts are created equal when it comes to braising. While breasts are lean and cook quickly, they tend to dry out when braised for a long time. Chicken thighs, drumsticks, and other bone-in cuts are better suited for this method.
- Why Bone-In Cuts Are Better: Bone-in, skin-on cuts like thighs and drumsticks have more fat and connective tissue, which helps to keep the meat moist during the slow cooking process. The bone also acts as a conductor of heat, helping the chicken cook more evenly and tenderly.
- The Solution: Opt for bone-in, skin-on cuts of chicken for braising. These cuts are more forgiving and less likely to dry out than boneless, skinless breasts. If you prefer breasts, consider braising them for a shorter time, or use a lower heat to ensure they don’t become overcooked.
6. Skipping the Searing Step
Searing the chicken before braising is often an overlooked step, but it plays a key role in developing flavor and ensuring tenderness. When you sear the chicken, you create a crispy outer layer that helps lock in moisture during the braising process.
- Why Searing Helps: Searing the chicken first creates a barrier on the surface, which helps to retain moisture during the slow cooking process. It also adds depth of flavor to the skin and meat, creating a more savory, tender result.
- The Solution: Before braising, heat a bit of oil in your pan and sear the chicken on both sides until it’s golden brown. This step helps to seal in the juices and improve both the texture and flavor of the chicken.
Conclusion
To prevent your braised chicken from turning out dry or tough, be mindful of the cooking temperature, liquid levels, and cut selection. Avoid overcooking the chicken, ensure you have enough liquid to keep it moist, and don’t skip the searing step. Allow the chicken to rest after cooking, and choose bone-in cuts for optimal tenderness. By following these tips, you can ensure that your braised chicken stays tender, juicy, and full of flavor every time.
Flavor Not Developed
One of the hallmarks of a great braised chicken dish is its deep, savory flavor. However, it’s not uncommon for the flavor to feel flat or underwhelming if certain steps aren’t followed. Braising is all about building layers of flavor, and if the right seasonings and liquids aren’t used or balanced properly, you might find the dish lacking. In this section, we’ll discuss how to adjust seasonings and liquids to ensure that your braised chicken is bursting with flavor.
1. Check the Balance of Seasonings
Seasoning is crucial when braising chicken. Without the right mix of herbs, spices, and salt, the chicken can taste bland. Since braising involves cooking the chicken in liquid for a long time, it’s easy for the seasoning to get lost in the process. The good news is that you can always adjust the seasonings during or after cooking.
- Why It Happens: The long cooking time allows the chicken to absorb flavors from the seasonings, but it also dilutes them, especially if the liquid isn’t seasoned well enough. Additionally, the braising liquid itself will absorb flavors from the chicken, but it needs to be properly seasoned to ensure that it enhances the overall dish.
- How to Fix It: To enhance the flavor, start by seasoning the chicken generously before braising it. Consider using a rub or marinade with ingredients like garlic, onion powder, paprika, and ground black pepper. You can also add fresh or dried herbs like rosemary, thyme, and bay leaves directly to the liquid for additional depth. As the chicken braises, taste the braising liquid and adjust the seasonings. You may need to add more salt, pepper, or even a dash of vinegar or citrus to balance out the flavors.
2. Use High-Quality Braising Liquids
The liquid used for braising serves as the foundation for the flavor of the entire dish. If the liquid lacks richness or depth, it will affect the final taste of the chicken. Traditional options like chicken stock, broth, or wine work well, but you can experiment with different liquids to bring out unique flavors in your dish.
- Why It Happens: If the liquid is too bland or doesn’t have enough complexity, it can lead to a dish that tastes flat. Commercially prepared stocks or broths can sometimes lack the depth that homemade versions provide. Similarly, wines that aren’t high quality might not contribute as much flavor as expected.
- How to Fix It: Opt for homemade chicken stock if possible, as it has a richer flavor compared to store-bought varieties. If you’re using store-bought stock, choose a high-quality brand with fewer artificial additives. Adding wine (red or white, depending on your recipe) to the braising liquid can give the dish an extra layer of complexity, as it adds acidity and depth. A small amount of vinegar or citrus juice can also help brighten the overall flavor and balance the richness of the chicken and stock.
3. Enhance with Aromatics and Vegetables
Adding vegetables and aromatics to the braising process can significantly enhance the flavor profile of the dish. Ingredients like onions, garlic, carrots, and celery are not only great for flavoring the braising liquid but can also contribute their own unique tastes to the chicken.
- Why It Happens: Aromatics are essential for building the foundational flavors of a braise. If they’re omitted or underused, the chicken might taste one-dimensional. Additionally, vegetables can absorb some of the chicken’s flavor, which helps to enrich the overall dish.
- How to Fix It: Sauté aromatics like garlic, onions, shallots, and leeks before adding them to the braising liquid. This helps release their natural sugars and intensifies their flavor. Adding vegetables like carrots, parsnips, or celery to the pot not only infuses the liquid with flavor but also complements the chicken with added sweetness and earthiness. Don’t forget to season these vegetables with salt and pepper before adding them to the liquid.
4. Layer Flavors with Spices and Herbs
Spices and herbs are vital in building layers of flavor in braised dishes. Fresh or dried herbs like thyme, rosemary, and sage, or even spices like cumin, paprika, or coriander, can take your braised chicken from simple to extraordinary. Herbs and spices need time to release their oils and infuse the braising liquid, so they should be added early in the process.
- Why It Happens: If spices and herbs are added too late in the cooking process, their flavor won’t have time to fully develop. Additionally, some spices can lose their potency if they’re overcooked or burnt, leading to a flavor imbalance.
- How to Fix It: Add dried herbs and spices to the braising liquid early in the cooking process. For fresh herbs, consider adding them halfway through cooking or as the chicken nears the end of its braising time to maintain their fresh flavor. Tie the herbs in a bundle using kitchen twine, so they can be easily removed before serving. Don’t forget to adjust the seasoning to your taste as the chicken braises, and add a pinch of salt to bring out the flavor of the spices.
5. Finish with a Flavor Boost
Sometimes, even after the chicken has braised to perfection, it may still need a final flavor boost to bring everything together. This is especially true if the braising liquid has reduced too much or if the chicken’s natural flavor hasn’t fully developed.
- Why It Happens: As the liquid reduces, it can become more concentrated, which may make the flavor too intense or even slightly bitter. Additionally, without the right balance of acidity and salt, the dish might taste one-note.
- How to Fix It: To finish the dish, add a splash of vinegar, lemon juice, or a bit of fresh herbs to the braising liquid just before serving. This helps balance out the richness of the chicken and enhances the overall flavor. You can also finish the dish with a drizzle of good-quality olive oil or a small pat of butter for added richness. Taste the sauce at this stage and adjust the seasonings, adding more salt or pepper as needed.
6. Let the Chicken Absorb the Flavor
The chicken will absorb the flavors of the braising liquid during the cooking process, but you can also allow it to rest in the liquid for a bit after cooking. This extra step helps deepen the flavor profile, as the chicken continues to soak up the seasoning.
- Why It Happens: If you serve the chicken immediately after removing it from the oven, the meat may not have had enough time to absorb all the liquid’s flavors. A brief resting period allows the flavors to meld and enhances the overall taste.
- How to Fix It: Once the chicken is cooked and rested, return it to the braising liquid and let it sit for an additional 10-15 minutes before serving. This will allow the chicken to soak up any remaining flavors and create a more harmonious dish.
Conclusion
If your braised chicken lacks flavor, there are several ways to boost it. Start by ensuring the right balance of seasonings, and use quality braising liquids to create a rich base. Incorporate aromatics and vegetables to enhance the depth of flavor, and experiment with spices and herbs to create a well-rounded profile. Finally, finish the dish with a touch of acidity or richness to balance the flavors. With these adjustments, you can turn a simple braised chicken recipe into a flavorful and satisfying meal.
For more tips on perfecting your braised chicken, check out this guide to troubleshooting chicken recipes that covers various techniques and solutions.
Conclusion
Braising chicken in the oven with crispy skin is a game-changer when it comes to creating a tender, flavorful, and satisfying meal. This cooking method locks in moisture while allowing the skin to become wonderfully crisp, offering the best of both worlds. The slow-cooking process infuses the chicken with rich, deep flavors from the braising liquid and seasonings, making every bite more delicious than the last. Plus, the versatility of braising allows you to experiment with different herbs, spices, and vegetables to make the dish your own.
If you’ve been looking for a simple yet impressive recipe, braised chicken with crispy skin is a must-try. The technique is easy to master, and once you’ve got the basics down, you can get creative by adjusting the seasonings, using different cuts of chicken, or adding vegetables for a complete meal. Whether you’re preparing dinner for your family or hosting guests, this recipe will surely be a hit.
So why not give it a go? Try this braised chicken recipe, and don’t be afraid to play around with flavors to make it your signature dish.